You might think that it’s easier to replace the fan which we’ve done in the past but that’s an extra $70 that you shouldn’t have to spend.
Ceiling fans are a pain to clean especially when they are near the kitchen area b/c then they get tarred and feathered or grease builds up on them and then dust sticks to them – yuck! And it’s already hard to reach them so you are in an awkward position when trying to clean them.
Here’s the trick – Goo Gone! It wipes the grime off like a charm! Put some Goo Gone on a white rag and wipe away – it’s really simple and works so quickly. I’m going to try this on the dirty, greasy microwave vents next! Wish me luck!!!
We just got an IKEA in St Louis – yay!!!! I’m from Texas and we had an IKEA in Houston so I know how wonderful it is and I’m over the moon excited about this. There are so many cool organization items there and affordable furniture – I just love it.
We have a tenant moving out end of May and their apartment hasn’t been updated since 1969 so the whole thing needs to be overhauled. Since we are on a budget, we are going to attempt to do the kitchen ourselves with IKEA cabinets. I’ve heard they are easy to install with the rails that are leveled on the wall for both the top and bottom cabinets and the adjustable feet so you don’t have to deal with shimming. I loathe anything that involves shimming. We shall see. I’m going to document it here.
First, we designed the kitchen in the IKEA kitchen planner online tool. This online tool can be glitchy so be prepared for a little frustration but over all I LOVE having access to a design tool online – LOVE diy stuff in general so this is great.
We have already renovated a kitchen in a similar unit so we had a head start on that but the cabinet sizes are slightly different for IKEA so that made it a little tricky. For example, they don’t have a 33 inch wide cabinet. The upper cabinets are also 3 inches deeper than standard cabinets which I like – more space.. So, here’s our design from the online IKEA 3D planning tool:
3D Line View in IKEA software:
Floor View in IKEA software:
On the left side of this kitchen is a window and a door leading out to the deck and on the right side is the entry from the dining room. The details of the cabinets from Left to Right, Top to Bottom (spacing may not be perfect in the tool, but that’s ok):
36 inch wide cabinets (top & bottom), Bottom cabinet has 2 drawers on top and doors on the bottom. We did this because there is a window sill there and the drawers can’t pull out all the way so we figured if the drawers were smaller in height, they could at least pull out the top drawer all the way.
30 inch wide cabinets (top is 20 inch in height – slightly shorter so you can have breathing room while washing dishes and bottom has a 1 bowl sink),
24 inch wide cabinet on the top and dishwasher on the bottom. The dishwasher is only going to be 24 inches wide but we need to put a panel between the dishwasher and oven in order to support the counter which would be about a half inch and we’ll add a cover panel on top as well so they are symmetrical. UPDATE: the dishwasher panel is actually more like 5/8 inches.
30 inch wide cabinets on top (15 inches in height so that we can put a built in microwave underneath – because their cabinets are slightly deeper than the regular cabinets they have special tools we can use for the built in microwave to make it level with the cabinets as far as depth goes) and oven on the bottom. The oven is about 30 1/8 inches so we left a space of 30 1/4 inches for the oven. UPDATE: this extra space was unexpected because ovens are normally 30 inches or less so we added a full cover panel to the side of the 12 inch wide wall cabinet mentioned below in order to make up for the extra space in the base cabinets.
12 inch wide cabinet on top and 12 inch wide cabinet with a door on the bottom (they didn’t have one that was 12 inches with drawers. UPDATE: we added a full cover panel to the side of this 12 inch wide cabinet to add 1/2 inch of space to match up with the base cabinets.
Next, is a pantry 24 inch x 80. But there will be a cover panel on the side of the pantry which will add an extra half-inch.
We have about 4 inches of extra space that we are going to put fillers on each end to fill. We’ll probably do 1 inch on one side and 3 inches on the other side because we realized we need to keep the existing venting duct work within the cabinet that is over the microwave (there was an oven range hood that vents outside and we want to reuse this for the over the range microwave) and that is cutting it REALLY close. :-0 UPDATE: we ended up putting 0 inches of filler on one side and 3.5 inches on the other side.
On the other wall from Left to Right is:
15 inch cabinets (top is the extra tall 40 inch height and bottom cabinet has 6 drawers- I love this idea of having several skinny drawers for utensils, hand towels, junk drawer, etc – feels very organized).
36 inch wide cabinets (top cabinet is the extra tall 40 inch height (because there is no soffit on this side of the wall – hopefully this doesn’t look funny to have taller cabinets on one side than the other – we shall see) and the bottom cabinet is 36 inch wide and has two drawers on top and then doors on bottom.
36x24x20 over the fridge cabinets with doors. We also bought panels to cover the sides of the fridge (not pictured here). These were the ones we weren’t originally going to get. UPDATE: We decided to return the over-the-fridge cabinets and get a dishwasher instead to stay above the $4,000 mark.
We left 1 inch of space between the cabinets and the walls at the ends and on the one side where the counter will be sticking out we left 3 inches for the overhang of the counter. We knew to do this b/c this is what we did for the other kitchen we updated and it worked out just fine. You want to leave some space in case the walls aren’t level, etc and you don’t want anyone bumping themselves on the edge of the counter if it’s sticking out.
The lady that worked at IKEA told us that we don’t need to put the fillers in the picture, fillers are just cover panels which you cut to size so you can order whatever you need in whatever size later. These cabinets are shaker style in off-white (GRIMSLOV). I figure you can’t go wrong in white for a rental and shaker style is my favorite. Another great thing about IKEA is that it’s relatively easy to replace parts when they break because everything comes in pieces that you assemble yourself and you can buy several components individually if you need to.
We did have a hard time getting to the $4,000 mark for the IKEA sale because we got our appliances at Home Depot (for their July 4th sale) and we didn’t want to buy the counter tops at IKEA since they were a little pricier than Home Depot for stone. You have to reach $4,000 before taxes in order to get the 15% off gift card. Also, they were out of sinks or in transition on sinks so we couldn’t get a sink there. We already had a faucet. I’d heard about people buying kitchen cabinets for the bathroom but we just had our bathrooms renovated and didn’t need it there. Well, we did need over the toilet cabinets, but 15 inches deep would probably be too deep and look funny.
So, we ended up buying over the fridge cabinets which we weren’t originally going to do – we were just going to have a stand alone fridge, but it’ll look nicer so we’ll see. UPDATE: we returned these and got a dishwasher instead – we were going to keep the existing dishwasher but it was going to look like an eyesore with everything else being updated.
Definitely make sure you allow enough time for the ordering of the cabinets – it takes a LOOONG time – like several hours. We decided to pick them up ourselves instead of choosing the delivery option. The delivery option was only $60 – should’ve done that. Everything fit in our mini-van with all the seats taken out (except passenger and driver seat, of course), so that worked out (even the pantry – which was VERY close – we got the 80 inch tall pantry), but we were there until 11pm waiting for them to bring down all the furniture pieces. The building closed at 9pm so we were just sitting around with stir-crazy kids – not good.
One thing we didn’t have in the 3D planning tool b/c we didn’t know about was cover panels for the exposed areas of the cabinets. You have to add those on so that the gap in the back of the cabinet is covered – adds a little bit more to the price. Every little bit counts to get to the $4000 mark. We also added some molding at the top and bottom. UPDATE: we are going to have to return the molding – it is too thick (1.5 inches on the thin side) and reduces the space too much between the upper and lower cabinets – we are already a little bit less than 18 inches – about 17.5. We bought the wrong molding and didn’t realize it. They had a thinner one we could’ve used. Oh well – we just did without – it looks fine.
Don’t you love having to update bathrooms?!?! It’s my least favorite thing b/c after all it’s just where you go to poop – how fancy does it have to be? Well, we aren’t always rational beings, right?
Everything in these bathrooms was purchased at Home Depot so that makes it nice and easy. I’ve been told that Moen is the best brand to buy when selecting faucets/shower heads, etc so I try to stick with that brand where it’s available. And also to never put ceramic tile on the floors (it’s cheaper but more likely to crack) so I selected porcelain tile.
We did have some unknowns come up – we had to replace most of the sub-floor in both bathrooms due to water damage (not surprising considering these bathrooms haven’t been updated since 1969 – we think) and we discovered some pipes needed to be updated once we opened the walls. You always have to expect the unexpected.
Isn’t that what they say on Survivor? Renovating can be a little like Survivor. Mentally, you are stressed b/c you aren’t sure if you picked the right contractor. Physically, you may not be showering – in the case of a bathroom update. Or you may not be eating right – in the case of a kitchen update. There’s dust everywhere and loud noises – as if you are in the wild.
Anyway, I digress.. When renovating – something always comes up, doesn’t it?!?! It does for us and I don’t think we are alone. Or that would be more like Naked and Afraid – anybody watch that show? I used to be against it b/c hello they are naked and in what world are you going to be naked and lost. You should at least have a pair of initial clothes, right? You’re not going to be like – Hey! I’m lost! And then proceed to rip off your clothes. But now I’m a fan of the show b/c it’s so interesting minus all the butt shots. Again, I digress. My ADD gets me EVERY.SINGLE.TIME.
We had a contractor do the bathrooms. In case you are interested, here are the selections we made regarding tile, etc:
Wall Tile Selection:
Grout: Polyblend #115 Platinum
Store SKU# 1001256662
Tile: MARAZZI VitaElegante Bianco 6 in. x 24 in. Porcelain Floor and Wall Tile (14.53 sq. ft. / case)
Store SKU# 1000047587
Floor Tile Selection:
Grout: Polyblend #165 Delorean Gray
Store SKU# 656844
Tile: MARAZZI Studio Life Central Park 12 in. x 24 in. Glazed Porcelain Floor and Wall Tile (15.60 sq. ft. / case)
Store SKU# 1001292431
Hall BathroomHall Bathroom
Master bathroom:
Master BathroomMaster Bathroom
The paint color we chose for the walls is Antique White. They are small bathrooms and it’s a rental so I figure you can’t go wrong with that. It also brightens them up and makes them feel bigger.
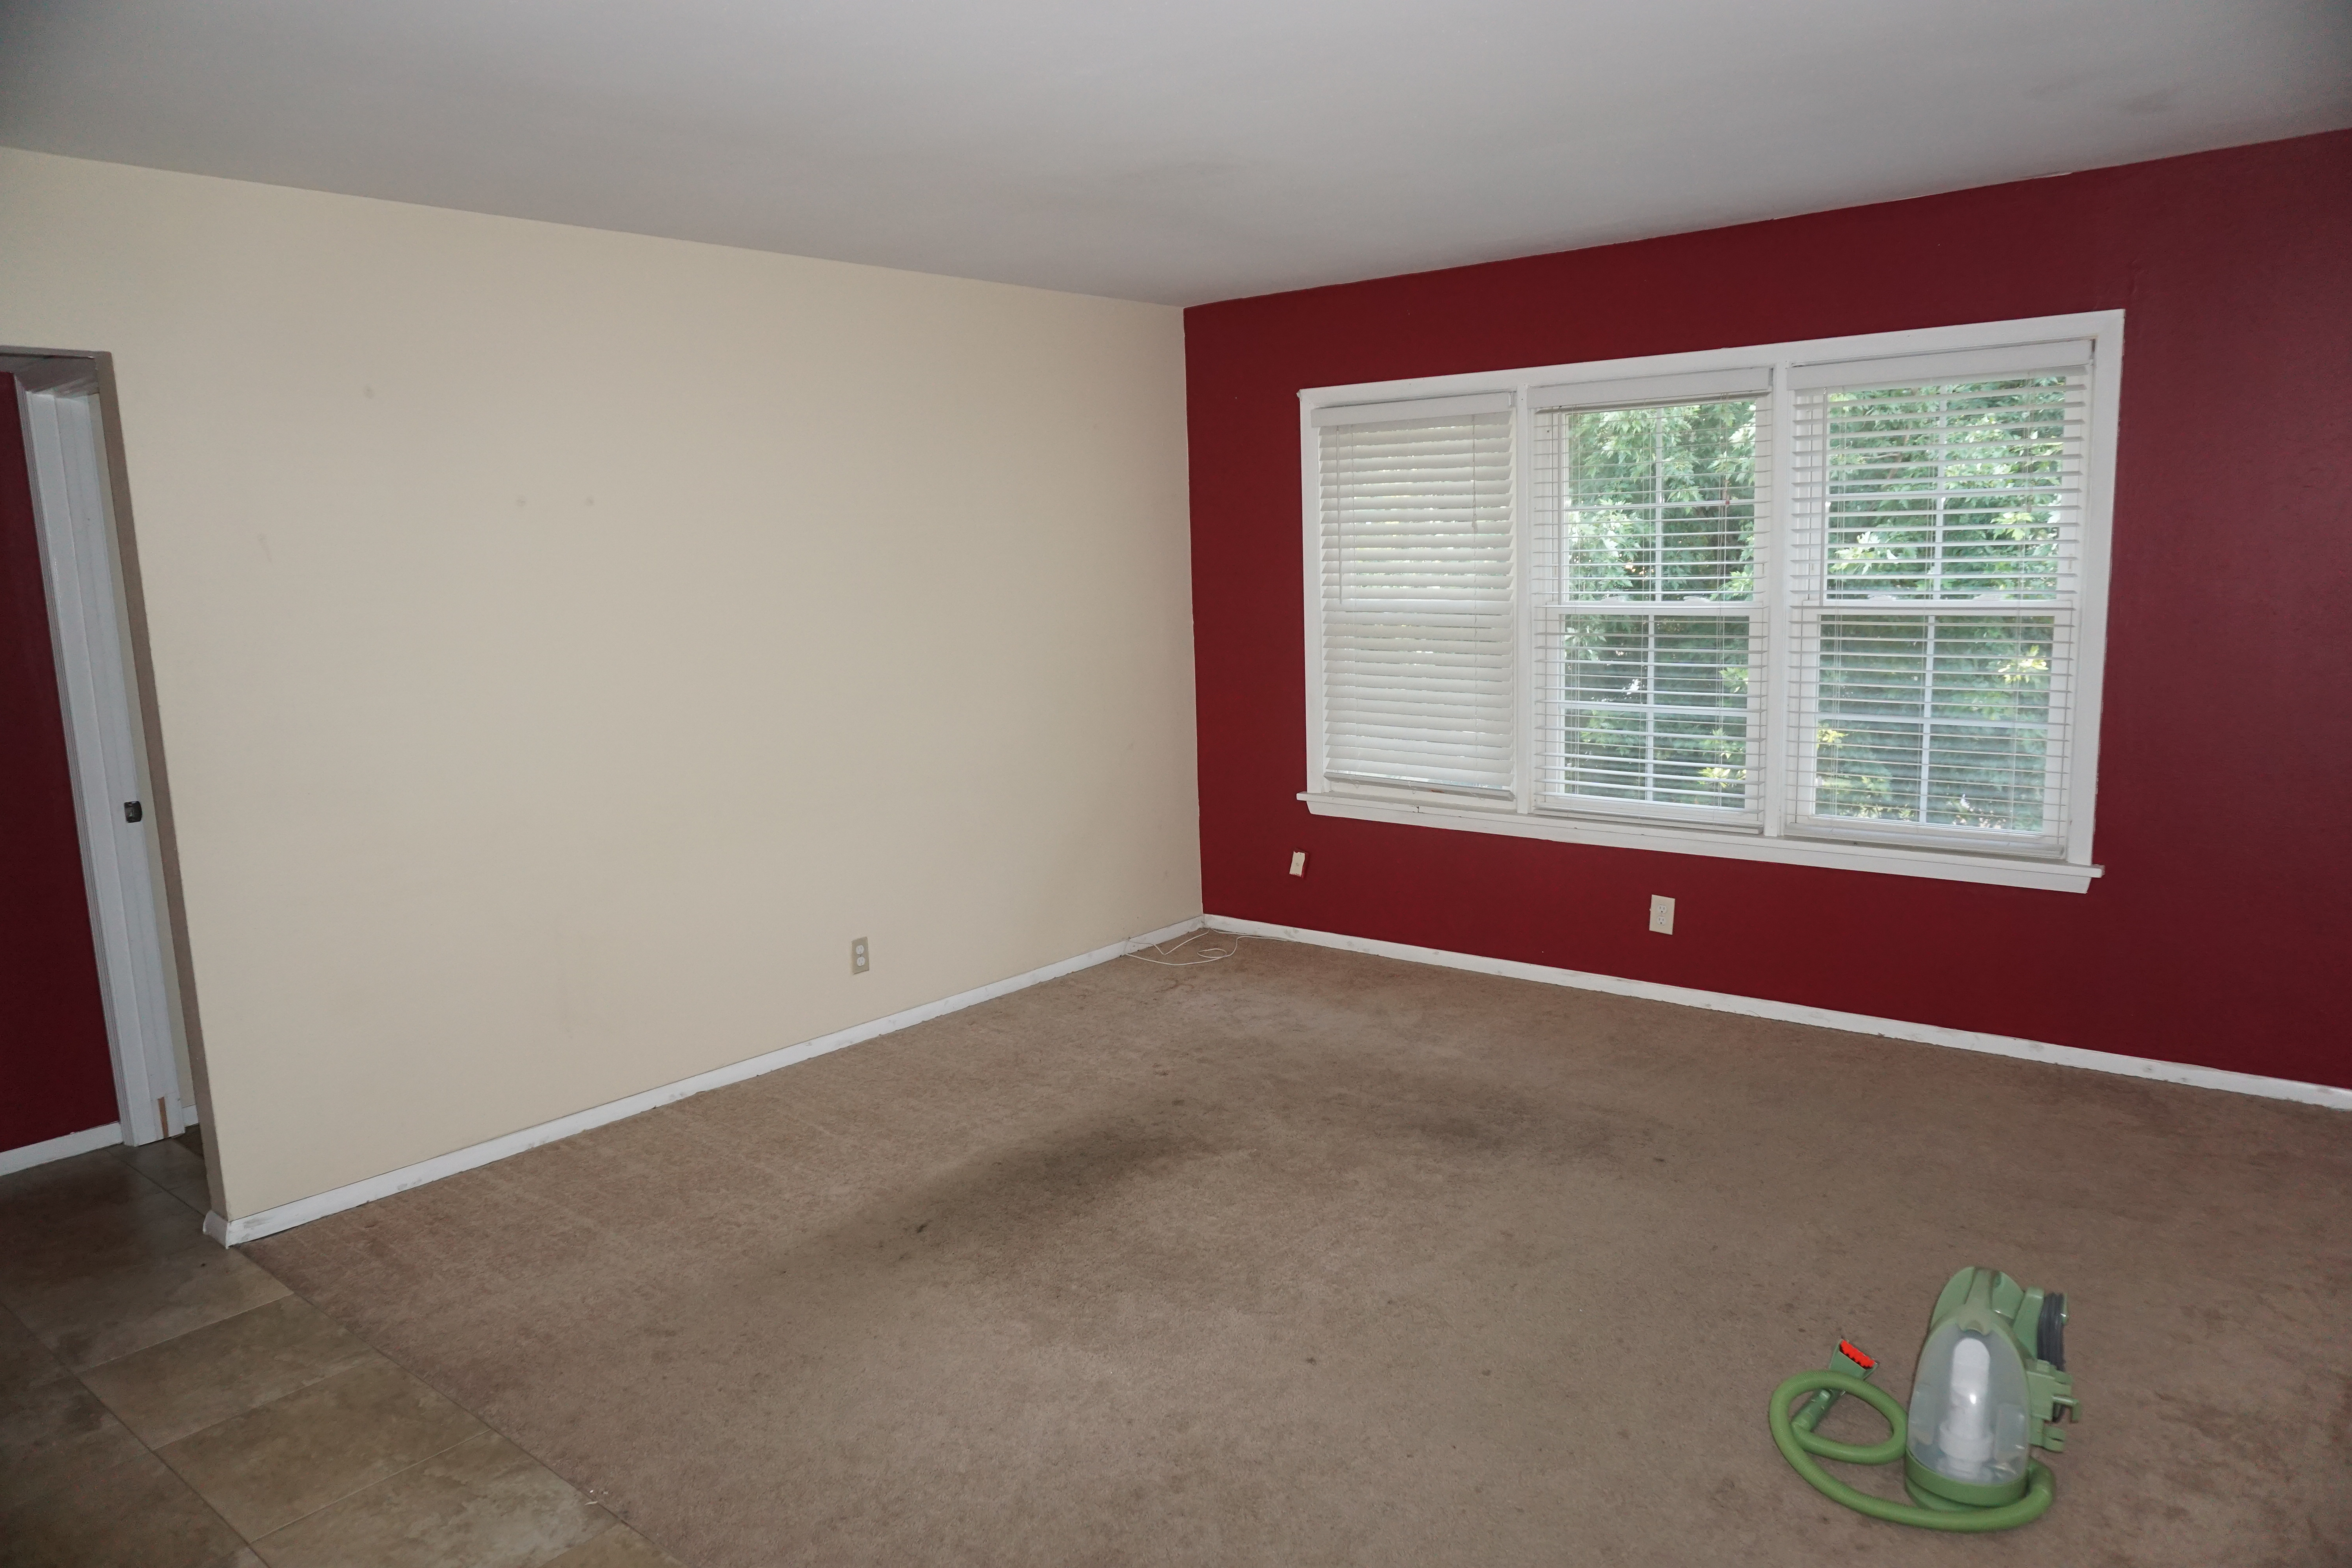
We had two tenants move out in one year so it’s been a busy year for us. We knew we wanted to update the kitchen in this unit b/c the cabinets were original and pretty grimy inside and out. It would’ve taken quite a bit of work to get them up to par and in the end might have ended up costing only a little less (in effort + money) than all new and wouldn’t have been exactly what we wanted anyway so we just bit the bullet. Here’s some before pics of the kitchen:
Don’t you love the Aztec chickens on the backsplash?!?
So, the more I hung out in this kitchen, the more I realized that the fridge was just seriously in the way. It bothered me so much that I hired a plumber to move the water line (for the ice maker) to the other wall. It was a challenging job – he had to re-route the water line from the basement all the way up. This apartment is on the second floor so he had to go through the first floor tenant’s apartment as well. He basically hooked up all 4 apartments at the same time which was awesome and he finished it all in one day!
In the future, or if tenants want to move their fridge now they are able. Rick Littleton at Plumbing Masters is who we used. We had other plumbers come out to give estimates but they had not-so-good ideas about moving the water line within the apartment through the walls for the same price. I guess they were just intimidated or didn’t know how to run it all the way up from the basement – not sure but so glad we hired Rick Littleton – I highly recommend him. This way, we got it fixed up for all the apartments and not just one. We also had him replace the waste arm for the kitchen sink b/c it’s an old building and just has old pipes and that’s recommended when redoing the kitchen since if it leaks later, you’d have to rip up the whole kitchen again to fix it – that wouldn’t be good.
We had to have an electrical outlet added on that wall as well for the fridge. So, we went ahead and did this in all the units also.
We also didn’t like the wall stove and we wanted to have a built in microwave. And what about that hideous light fixture above the sink built right into the backsplash? No, no, no. It was all just a bit too much so we hired Affordable Kitchens and Baths in St Peters, MO to help us. They were so helpful and the price was right. Hopefully, this kitchen lasts a long time – time will tell.
We ended up using Express Granite in St Peters to do the granite countertops b/c they had a better price, but Affordable did everything else. My husband and his dad did the demo work before hand.
We repainted the walls in Gracious Greige by Lowe’s HGTV, changed out the ceiling fan b/c the old one was covered in grease and the dust from construction just stuck to it like glue (tarred and feathered, it was) – it was going to take more time to clean it (time is money) than just spending money on a new one. My husband did the baseboards. I repainted the trim and the back door (Behr – Polar Bear – this is what we use for all our trim and doors). We put new blinds. I used grout renew (oyster gray) and repainted/sealed the grout after cleaning them thoroughly with a grout brush (see other post about how I screwed it up at first with an oxiclean solution). And wallah!:
Kitchen – AfterKitchen – After
Dining Room/Living Room (Before Pics):
Dining Room – BeforeLiving Room – Before
There’s my kids! 🙂 We removed the cowboy doors to make it more open between the dining room and the kitchen and I repainted the door trim but didn’t replace it. I repainted the walls in the dining room and the living room (Behr – Sandstone Cove). And we replaced the carpet in the living room – had Home Depot do this. We also replaced some of the air conditioning vents b/c the previous tenants painted them and just found it easier to replace. And of course, new base boards. The living room didn’t have a light fixture – we had the ceiling fan added with light fixture.
Dining Room /Living Room (After Pic):
Dining and Living Room – After
Hallway (Before):
Hallway
We repainted this hallway (Behr – Sandstone Cove) and the old-fashioned light fixture had broken glass, so we needed a square 9 x 9 piece of glass to fit into it. I almost had a piece of glass made but then we went to the Home Depot and they had some hard plastic that they recommended using so we used that instead – Bryon was able to cut it with a box cutter and fit it in – it had a textured pattern as well which looked nice. Then, we got some white spray paint and sprayed the metal fixture white b/c it had gotten scratched up during the transporting process in the car (kids stepped on it repeatedly…). I can’t seem to find my picture of that fixture b/c it must’ve gotten lost the day my phone died. I did have to repaint that 6-panel door at the end of the hall as well b/c it was pretty dinged up. No “After” pic for the hallway. 🙁
Master Bedroom (Before Pics):
Master Bedroom – BeforeMaster Bedroom – Before
The previous tenants had an A/C unit in the window – this is what made us decide to put ceiling fans in all the bedrooms – it’s a second floor unit and I think ceiling fans should be pretty standard in second floor units. They can run on the warmer side.
A couple of years ago, Bryon also got up in the attic to check on the A/C connections and it turned out that the A/C duct work was not hooked up properly (like, not even connected – I’m not sure how the previous owners didn’t catch this (well I guess I know how – nobody likes going in the attic – including the A/C company) – no wonder the tenants were hot) so he reattached the duct work and we got a recharge in the A/C unit – our plumber was also certified for HVAC so he did the recharge for us.
We also replaced the carpet in this room, the blinds, and the baseboards, as well as a fresh coat of paint on the walls and window trim. As you can see, the closet shelving is really old – I think it must be original, so my husband replaced the shelving with a more modern wire racks and we decided to put two racks on each side so that the new tenants can hang more clothes. I repainted the closet doors and we had to put a new closet door knob on the one side. That’s about it for this room.
Master Bedroom (after):
Master Bedroom – AfterMaster Bedroom – After
Master Bathroom (After):
Master Bathroom
Luckily, we didn’t have to make any updates to the master bathroom besides a fresh coat of paint (Lowe’s HGTV’s Basalt Powder – not my fave, but it will do). We really wanted to add a new vanity instead of the pedestal sink so that they could have some kind of storage in this bathroom, but we ran out of time and motivation. :-/ I love the tile work in there though – that was done by the previous owners.
Second Bedroom (After):
Second Bedroom
I guess we didn’t take any before pictures of this bedroom b/c this is where we stored all of our stuff throughout the renovation. We did have to replace the carpet and do a significant amount of work spackling the walls. We repainted the window trim and walls, added a ceiling fan, updated the closet shelving, new blinds, new baseboards. And I think that’s all.
Third Bedroom (Before):
Third Bedroom – BeforeThird Bedroom – Before
The wood floor was nice but they had these unattractive stickers all over them. 🙁 We decided to do the easiest thing and carpet over them. It was a shame b/c we would’ve loved to leave them wood – the girls called it the penny room b/c they found a penny in it and also the dots all over the floor looked like pennies. :-p One wall was wood paneling – we just repainted all the walls with Lowe’s HGTV Stone Isle – I love that color very much and it looked so nice against the white trim. We replaced the blinds, updated the shelving in the closet, new baseboards, painted the window trim and the door to the room. I also painted the ceiling in this room b/c it was pretty bad off.
As you can see, there’s a lot of wires in the corner. The guys that lived here previously were three college guys and they paid extra to have Cat 5 lines running through each room – this way they could each get very high speed internet. Unfortunately, it was an eye sore. So Bryon debated between cutting the lines or taping them to the wall or … In the end, he decided to keep the functionality but instead he put Cat 5 (ethernet) outlets on the walls in the closets of all the bedrooms and in the living room so that any future tenants would have the option of hooking up the lines without the need to drill new holes in the walls or they could not. The Internet comes in the apartment through the master bedroom closet so future tenants could just use wireless and not have to have these ugly lines running through each room. Anyhoo, we left the option and just put outlets on the walls so they could hook it up if they want but we guess most people won’t want that.
Third Bedroom (After):
Third Bedroom – After
Hall Bathroom (After):
Hall Bathroom
Only thing we did to this bathroom is paint the walls in Lowe’s HGTV’s Icy Avalanche. This is not my favorite color but it was good enough. It’s a very manly color though so I think guys will like it. Oh, and we added a new curtain rod.
Common Area (Front):
Well, as if renovating one unit wasn’t enough. We wanted to add more work for ourselves. :-p The front of the building walking up to the apartment hadn’t been updated in a looong time and it showed so we really wanted to make that look nicer. I wish I had before pictures, but I don’t. 🙁
Downstairs Common Area:
Common Area First FloorCommon Area- First Floor
Upstairs Common Area:
Common Area Upstairs
We had new carpet put down. Shout out to HomeTown Floors in St Peters, MO! They rocked the house on this one. Bart came out to meet with me several times to make sure I had what I wanted. He helped me pick out the type of flooring – this is a commercial carpet in dark gray. And the installer David and his wife, Matilda, were such an amazing team. They worked their tails off to finish the carpet in one day and it was a pain to get around this banister – let me tell you. The previous owners didn’t have carpet up here for that reason, but he did such a great job. We love the end result.
We repainted the walls in Lowe’s HGTV’s Stone Isle – my new favorite color. And I made some magnet boards/bulletin boards (couldn’t resist the opportunity to make more magnet boards! :-p). I figure why buy boring art work when you can have magnet boards!! ooh La La! :-p The downstairs has 2 dry erase/magnet boards and a bulletin board in the middle. The upstairs are 2 tack boards and one magnet board. I have a blog post on how to make the tack boards as well.
Cara (my 6 year old) actually made the yarn design on the left and I made the one on the right. I like Cara’s better. I think these tack board patterns could be a good representation of each of our minds – see how mine is all tangled up and chaotic? – my brain feels just like that. There’s also a picture of the mailbox – my husband added some trim around it – it was an eyesore before with jagged wood all around the mailbox from when they installed it.
Common area (Back):
Common Area – Back StairsCommon Area – Back StairsCommon Area – Back StairsCommon Area – Back StairsCommon Area – Back Stairs
Again, double shout out to HomeTown Floors for rocking out these back stairs in only one day!!!!!!!!!!!!!!!! Did I mention that I love them? David and Matilda again rocked it out. Bart helped me pick out the flooring type and coloring to match the paint. These stairs used to have metal (gold) treads on them that were sooo loud. It was like someone was beating a metal can 20 times every time someone went up and down the stairs. If you wanted to be inconspicuous, you’d have to make like spider man up the stairs.
So, Bart had this idea to use rubber treads and it is so quiet now! Not to mention, it looks so much better and it’s so easy to clean – just sweep and damp mop after. The rubber treads sweep off really easily which I was kind of concerned about – I thought stuff might get stuck in there, but it doesn’t – just sweeps off.
We also painted the walls back here (Behr’s Vintage Linen) – it’s a neutral, off-white sort of color – very warm – I like. And it goes well with the flooring – thanks Bart! These walls were a challenge to paint though. They used to be a glaring white color with lots of dings and stains. But these walls are extremely tall in places so I really did hesitate to paint them until the very end. And my husband helped. I have a separate blog post on how we were able to paint the tall walls so check that out.
Another thing my husband did, was update the trim around the furnaces. It was basically one of those eyesores that needed to be fixed. Rule of thumb in rentals – if it’s an eyesore, fix it. A piece of the trim was missing and we couldn’t match the trim at Home Depot or Lowe’s so my husband thought – no big deal, I’ll just buy all new trim and update the whole thing. Which normally it wouldn’t be a big deal but as we know with renovating that even the smallest of things has the potential to turn into a big thing. (Makes you think extra hard about even replacing a towel rack lest the whole wall fall down, eh? :-p)
Well, after he started removing the trim the door frame basically fell out. It turns out that the door frame was being held in place by the trim.. So, a new project began of installing the door frame which involved a lot of shimming and working around odd shaped jutting out sheet metal while on an extra tall ladder above stairs – so not fun!
And, of course, I had to get up there and dust those furnace doors which hadn’t been dusted since 1969 – no joke.. I sort of re-realized that I am scared of heights – a fact that I take for granted on a day to day – especially on a shaky extra tall ladder at the top of a flight of stairs but I had to get that very last dust bunny.
After he got the door frames secured, finally the trim project could begin. Are we done yet? Not yet, then he needed to install new baseboards.
In the garage, we installed a new garage door opener.
In the basement, my husband patched up some holes that were made in the plaster when the plumber put in the new fridge water lines. Turns out, working with plaster is not too easy either. I still haven’t found anyone who will replace the holes in plaster in the basement garage where we had to replace some pipes – one guy sent me a stone-faced email: I’m sorry, but I cannot help you with your plaster project. 🙁 I get it.
Shur-line edger (the one with wheels that can be attached to extender pole)
Duct Tape
Paint Brush
Paint pan that is wide enough (see the metal pan bought from Home depot) – you’ll need to be able to easily fit the shur-line edger in there flat so test it out before you buy the pain.
Extender pole for painting
Paint roller (that can be attached to extender pole)
Trim roller (that can be attached to extender pole)
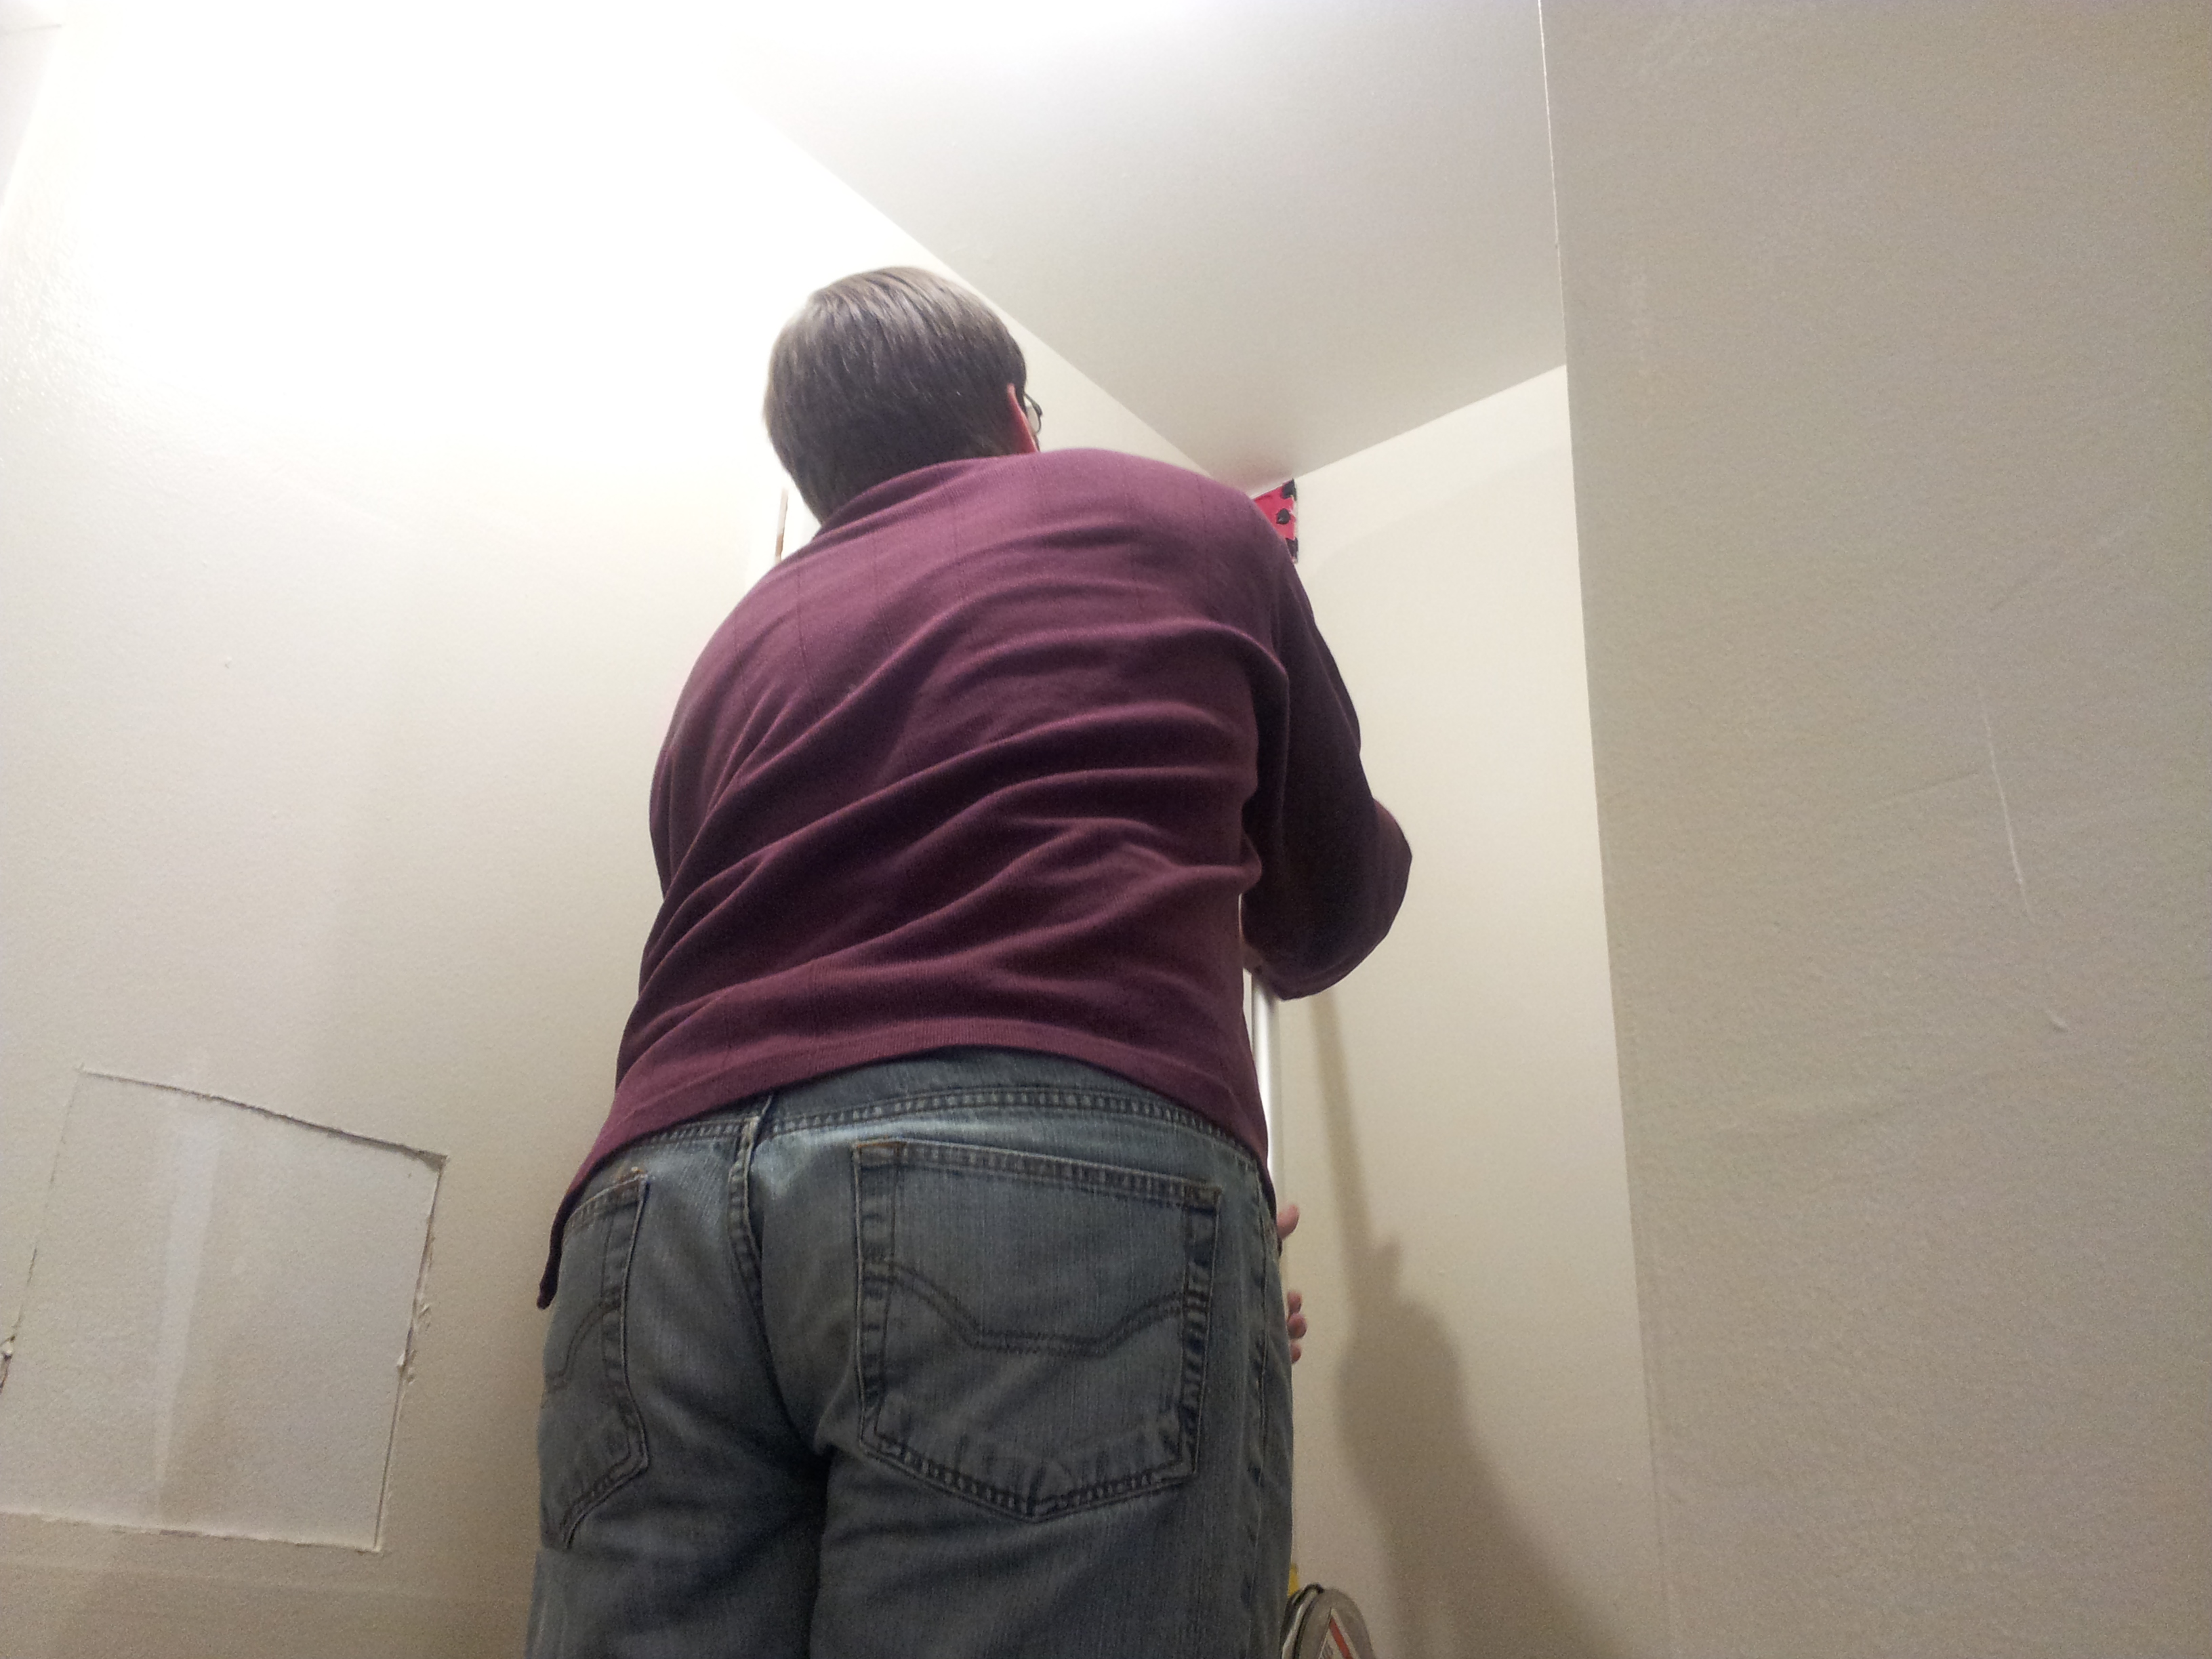
Ladder (we borrowed an extra tall one from my husband’s dad)
Here’s a picture of the tall wall (this was the finished result):
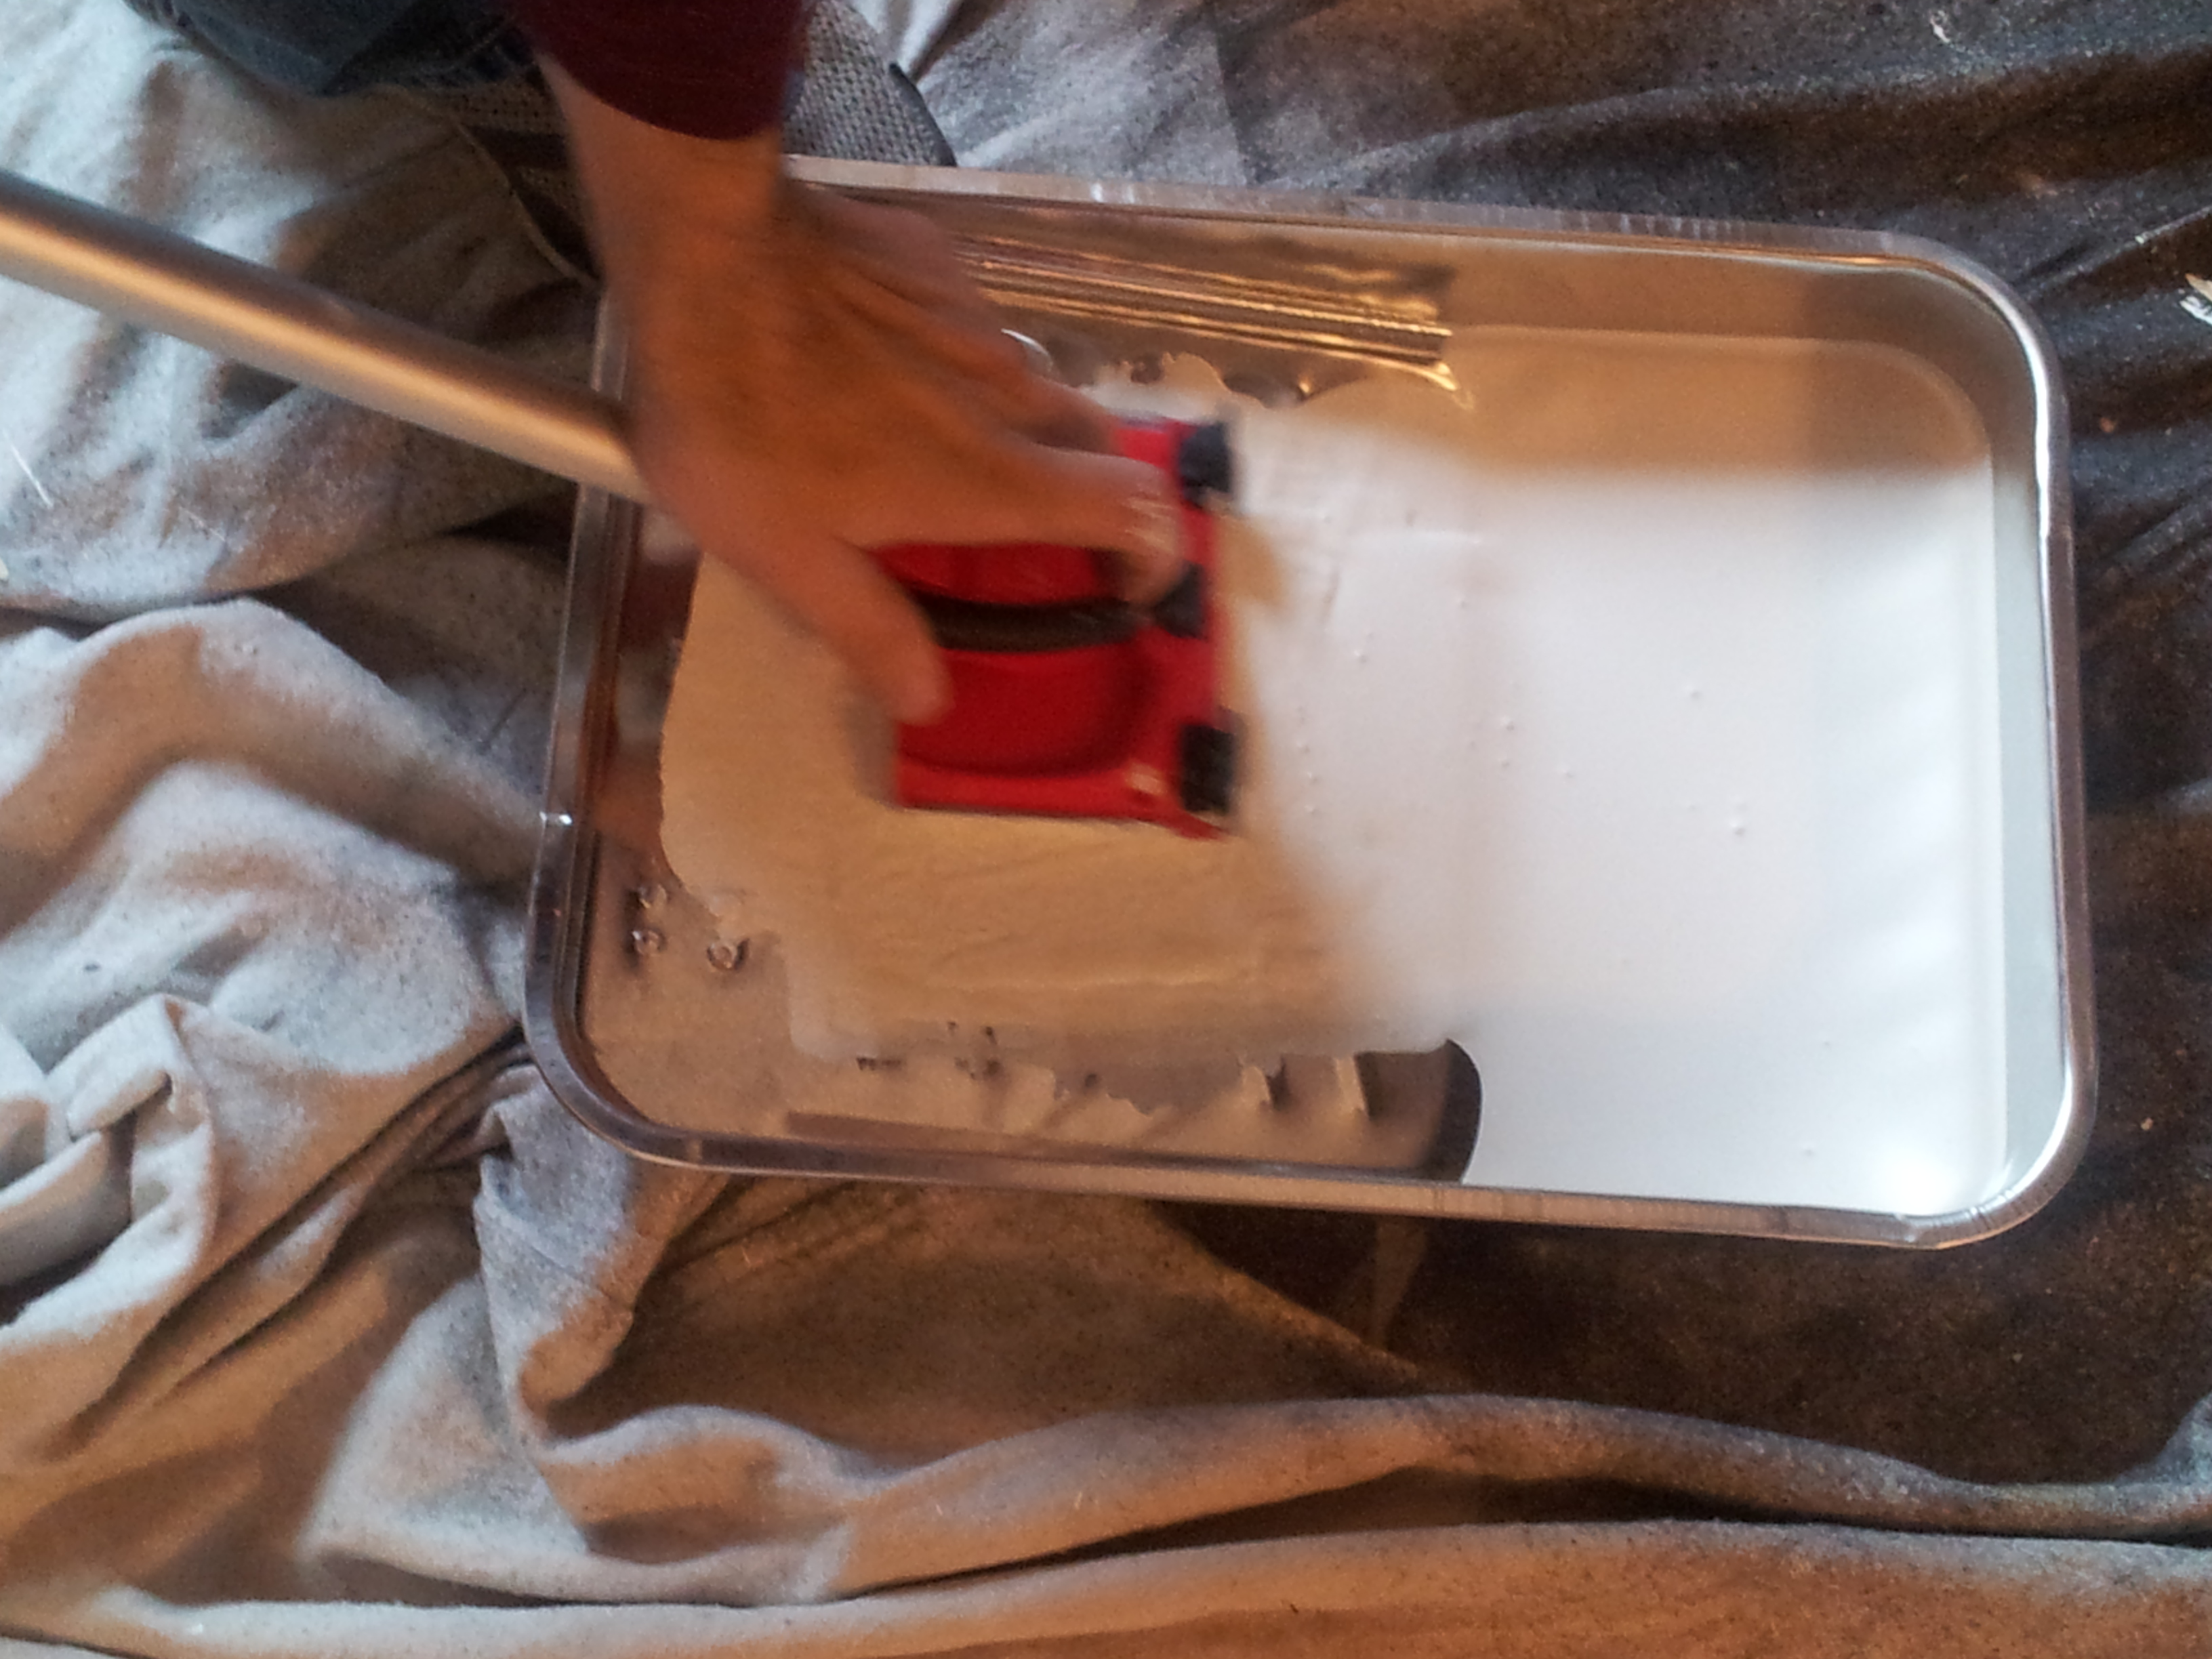
We rolled the walls with a roller and extender pole which got significantly harder the higher you got on the wall b/c you don’t have as much control on the highest parts and you can’t put as much pressure. Then, we were left with the edges and the corners of the wall to do. We bought this Shur-Line Edger from Home Depot (the one with wheels) and this metal pan b/c the paint pan we had wasn’t wide enough for this edger So, you rest it in the paint and then you need to squeeze some of the paint off, especially at the upper edge near the wheels. This is very important b/c if you have too much paint near the wheels it’s going to squeeze off onto the ceiling.
This is what your edger should look like. See how there is less paint at the top?:
It should not look like this:
Now, push down the ceiling protector:
And edge away! The important thing is to move this thing side to side, not up toward the ceiling or again you will push paint up over the wheels and that will get it on the ceiling.
And make sure you are clinching your butt cheeks just perfectly as seen here. Sorry, I couldn’t resist that one. But seriously, my husband did use a ladder for this b/c you can have more control over the edger this way, but there were areas on the stairs where he couldn’t use a ladder and it still worked out fine. But make sure you practice before you try it on a hard to reach area. It takes some trial and error to get used to the way it works. This is something I didn’t do in the front common area and I did get it on the ceiling in places – woops! Again, I’m still working on my impulsivity and impatience.
And then for touching up, I duct-taped my favorite paint brush to the extender pole and touched up some of the corners, etc. The edger doesn’t work as well in the corners – the head of the edger actually rotates to do the corners, but we just didn’t think it worked as well as it did near the ceilings – mostly the corners had to be touched up. My husband used a trim roller (see pic below) in the corners also – this worked better for corners. And we’ve just seen that they have corner rollers at Home Depot though we didn’t try them – worth a try next time.
A bad day renovating is a bad day indeed. This day, I couldn’t seem to do anything right. First, I messed up the tile grout in the kitchen by using an oxiclean/water solution on dark grout. Apparently, this doesn’t work too well on dark grout or grout that’s possibly never, ever been sealed… Yep, I should have followed my own advice and tested on an area before doing the whole floor but what can I say?!? – I’m kind of an impatient/impulsive person. I’m constantly trying to work on that and God is definitely trying to help me out with that through experience. :-p
Next, I scrubbed the black fridge too hard and left dull streaks on it – I made the fridge that was only 2 years old look like junk. Really?! The one time I got gung-ho about cleaning something. See – this is why I’m not gung-ho about cleaning! :-p
So, I decided to go home so I wouldn’t screw anything else up and found someone parked right up on my tail which I cursed about in front of the kids – woops! Kids, don’t say the words I said – they are bad! Mommy, which words? Oh, nevermind… While trying to get out of my spot, I bumped the car that was right up on my tail! Then, the lady magically appeared at my window. She offered to move her car and I told her she might want to take a look at her car b/c I think I bumped it. She was nice and said there wasn’t any damage so no worries.. Whew! Now, I just needed to get home in one piece and not screw anything else up!
Thankfully, there was a fix for both things that got messed up. Luckily, my husband is a problem-solver and not a panicky person like me. He had two suggestions and they both worked. Praise God for him – he kept me from trying to jump off a cliff – kidding – not a physical cliff but a mental cliff.
There’s the two products that saved me – Gel-Gloss and Grout Renew!
1.) We just rubbed the gel-gloss all over the fridge door in circular motions (wax on, wax off :-p) using a white cloth and let it dry (sit for 10 to 15 minutes) then wiped off with a cloth. It’s good as new – barely can see where I rubbed it raw. You will want to test on an inconspicuous spot to make sure this is going to work for you. 😉
2.) The Grout Renew was more time consuming. I found the matching color for the grout that was already there. The grout was now splotchy colored – some areas darker than others and some areas were even white, but all areas were at least lighter than before so I got to pick a lighter grout color than it was previous – bonus! I just picked an in between grout color of the same shade and it evened out the light and dark areas. I took a small paint brush and painted the grout renew on the grout, then worked it in with a soft bristled toothbrush. I kept a damp white cloth on hand to wipe off the tile with every application. You don’t want this to dry on the tile. Yes, this was time consuming but it looked great when finished. Whew!
Here’s a pic of the kitchen before renting – it cleaned up pretty nice:
I had some more close up pictures, but I took them with my phone which happened to die shortly after we put the For Rent sign in the front yard with my phone number on it. 😉 God’s trying to help me learn to be less panicky too, I think! :-p
We’ve recently had experience with trying to clean graffiti off of brick in the indoor common area of our building and I’m going to share a little bit about what worked for us. I’m going to honest with you – it’s a pain! You will need the following:
Goof Off (we got from Home Depot) – you will want to spot test to make sure no discoloration
Scrub brush (wire brush would be nice but we didn’t have one)
White rag
Gloves
Fan to air out the place (those fumes will make you dumb)
60 grit sandpaper
Sanding block
Big muscles and your own grit (aside from the sandpaper’s)
You will want to open windows to air out the place or you may lose a lot of brain cells. Also, wear gloves! You will have to spray those bricks ALOT – like douse them with the Goof Off. And you will have to sand like you mean it. I had my husband do the sanding b/c he had to put his back into it. :-p
Protect the flooring underneath or it may get messed up like ours did (the carpet got stained red) – luckily, we were planning to replace it anyway so we weren’t trying to be too careful.
You will want to cut the sandpaper out and place it into the sanding block. You have to lift up the end of the sanding block to get the sandpaper in there and then once you let it go, the prongs pierce the sandpaper and keep it in place. Do this for each side of the sanding block.
Then, spray the bricks – scrub as much away as you can with the brush and the rag – if that gets it off great. If not, then try the sanding. You may have to sand each brick for quite some time. You’ll have to be persistent here, but you should see results after a little bit.
Disclaimer: If stuff gets screwed up, it’s not my fault. I’m no expert – just a normal person trying to clean up some bricks..
This is the after picture. I didn’t take a before picture – sorry. The brick is still wet in this pic so it took some time to dry and look normal again.
Gray is the IN color right now or so it seems, but I have such a hard time liking it! It all stems back to when I first met my husband. Gray is his favorite color (I guess b/c it’s manly [insert man grunt here]). So, when I first met him and went to his house – it was a bachelor pad with actual flannel sheets hanging as curtains instead of curtains – getting the visual now? And I found that he painted the entire house a light shade of gray and the baseboards were a darker shade of gray. I’m not going to lie, it kind of made me think of a prison. I called that shade of gray “prison gray” from then on. And, after that, I couldn’t bring myself to paint any rooms of the house gray – I developed an aversion.
Before I moved in, I repainted every single wall to a non gray color. But then what happens – gray is now IN. So, I’m forced to reconsider. I have tried out a few shades of the HGTV Sherwin Williams line at Lowe’s. And I fell in LOVE! Gracious Greige and Stone Isle are my favorite. It seems the lighter shades of gray remind me of prisons or mental patient facilities (not that I’ve ever been in one, yet – there’s still time! :-p) because they can come across as cold. Though, I did do another post on Lighter Shades of Gray in which I found some that aren’t cold – here’s the link: Lighter Shade of Gray But here’s my current review of these shades:
5 shades of gray. I didn’t quite have the finances or energy to try 50. :-p And no I’ve never seen that movie and don’t plan on it. That’s just not something I’m into. I’d rather men be good old-fashioned nice, you know? Nice is sexy. I’m not so much into crazies or encouraging crazies:
1.) Icy Avalanche (lighter shade on same paint card as Stone isle): I think this was the exact color of prison gray that my husband used on his first house. I don’t recommend this one. Though I used it in a bathroom where the tile was grayish so it might have just been a little overwhelming – still don’t recommend. I’ve found that the trim, tile, etc in the room really effects the way the paint color comes across.
2.) Stone Isle (slghtly blue-ish gray but more on the gray side – still very neutral): I LOVE this color. It kind of reminds me of like a beachy kind of gray – my brother called it cape cod. It’s still on the neutral side. It looks very modern and classic. I wouldn’t paint an entire house in this color, but one or 2 rooms would be good. I actually painted the common area of our four-plex building in this color b/c I’m using some artwork that has red in it and it will go really nice with red. It’s also very neutral but still modern and stylish. I’ve gotten alot of comments on this color from the tenants – they really like it. It comes across as warm even when paired with red/brown brick. LOVE this color.
3.) Repose Gray (little darker than what I was looking for): This was a little darker than what I was looking for in a rental house. I needed more neutral and light.
4.) Basalt Powder (HGSW2457 – lighter shade on same paint card as Gracious Griege): I painted the other bathroom with this color and it’s not bad – not great either but not bad – just kind of meh neutral. It looks very close to white though so it depends what kind of look you’re going for. If you want an almost white color, then this might be for you. It might come across as a little cold though in a living room – I think for a bathroom it was alright. UPDATE: I tried this in the living room in a different unit and I really like it! It looks very modern. See other post Lighter Shade of Gray
5.) Gracious Greige (HGSW2456): LOVE this color. I would paint an entire house in this color and not think twice. We painted the kitchen of our rental unit with this color and it looks great. This is a very neutral color and it’s also light enough – not too dark. Plus, it’s got a little beige in it so it’s not all gray – more like grayish. Good for those of us who are still walking the line on whether to like gray or not. This is my new favorite neutral.
Here’s the gracious greige in the kitchen:
Gracious Griege Kitchen
Here’s the Stone Isle in a bedroom:
Stone Isle Bedroom
Here’s the Icy Avalanche in the bathroom (don’t recommend – I just felt like it was kind of blah and seemed very masculine to me – think garage. Maybe b/c of the colors it’s up against – that makes a huge difference):
Icy Avalanche Bathroom
Here’s the Basalt Powder in the other bathroom (again not my favorite – very close to white – but it is neutral). Sorry you can’t really see the wall that much in this picture – the door is in the way and the lighting’s not great. It’s such a small bathroom – hard to get good pics:. This one kind of made me think of a dentist office or a pharmacy :-/:
We decided to rent out our house when we moved instead of selling it. Here are some of the updates we made in order to make it rental-ready:
Here’s the kitchen:
Kitchen
The kitchen didn’t need much work, in my opinion. Sure, we could’ve updated some things like the countertops and the backsplash to make them even nicer, but we really didn’t think it was necessary at this time and for this market – they are in pretty good shape.
We really wanted to add shelving or cabinets to the one empty wall but we didn’t get around to it this time.
We did need to scrub the grout in the floor tile b/c it had turned really dark. I did this with an oxyclean/water solution that I sprayed in the grout and allowed it to sit for a few minutes, then scrubbed with a hard toothbrush – worked like a charm. Note: You should spot test if this will work for your grout before doing it b/c if you have dark grout or the grout hasn’t been sealed in a while it may not be the best idea.
The biggest problem with this kitchen is that there is no pantry. So, we turned a coat closet that is right next to the kitchen into a pantry, as shown below. My husband used 3/4 inch sanded plywood, cut to size and 1/2 furring strips on the sides to hold them in place. We painted them white. They are all removable so if they would rather have a coat closet, then they can stack all the shelves on the bottom shelf and keep the rod in place (see the brown rod below).
We also got a new 6 panel solid wood door that opens to the left – making it more convenient as a pantry. The old door opened to the right which wouldn’t have been as convenient since the counter top is to the right. We chose solid wood in case later we want to add a spice rack or something to the door.
Pantry
This is the dining room – no updates here – just scrubbed the grout.
Dining Room
This is the living room. My husband had to replace the carpet. We chose to go with Allure vinyl plank flooring (not Ultra click and lock but the kind that sticks together) – this is a blonde color. It’s really easy to install – we’ll see if it holds up. UPDATE: Our first tenant moved out after a year and it looks good as new. 🙂
Living Room
Here’s the hallway. It was redone with Allure Ultra a while back and has held up really well through 2 rounds of tenants (now 3 rounds of tenants) which is amazing for a high traffic hallway. We would’ve loved to put Allure Ultra everywhere but it is significantly more expensive than regular Allure Vinyl flooring and a little bit trickier to install since it’s interlocking and the planks are flexible. The regular Allure vinyl plank is peel and stick (sticks to each other so it’s floating still). We figure we’ll try it out and see how it holds up.
Hallway
There is one bathroom off the hallway. We didn’t do anything to it this time around:
Main floor bathroom
The following 3 pictures are the bedrooms. We chose to do laminate floors in the bedrooms b/c there was a sale and we wanted to try out a few different types of floors to see which holds up the best. Ideally, at some point, we will have consistent floors. There’s still carpet in the master bedroom as you can see b/c it wasn’t too badly damaged. UPDATE: this laminate floor held up really well too through one tenant (1 year) – not a scratch or any problem with it. Woohoo! I think we are permanently done with carpet.
Bedroom 1Bedroom 2Master Bedroom
The basement ended up being quite time consuming. We needed to replace the carpet b/c it had been badly damaged. Carpet is probably not the best choice for a basement anyway. However, we had a dilemma b/c we had a french drain and sump pump put in our basement when we lived there. For that they had to dig up around the edges of the basement concrete to lay the french drain and then they poured new concrete over it. For this reason, the basement was no longer level.
The concrete they poured in was not high quality so it wasn’t smooth and it was also higher than the rest of the basement. We had 2 options, we could pour more concrete in the basement to make it level or we could grind down the edges. We decided that grinding down the edges would be easier and less expensive. So, my husband rented a concrete grinder and grinded down the edges to try to make it more even with the rest of the basement.
Then, he laid down some Allure flooring (the color is IronWood – looks blackish gray). I kind of wish we had chosen Allure Ultra for this b/c it’s waterproof but we didn’t. If this doesn’t hold up then we will next time. The ceiling of the basement is a really cool type of drop ceiling that sits flush against the ceiling joists – thereby raising the height of the ceiling. We made this update when we lived there as well as adding the recessed lighting – makes a big difference to the space. This space makes a great second living room/kid’s playroom or recreation room. UPDATE: this flooring lasted great through one tenant (1 year). There’s a couple of places near the stairs where the flooring has a little too much gap in between the planks and it catches dirt, etc but other than that it’s still great.
Basement Living AreaBasement Living Area
Basement bathroom. There had been a leak at one point in the bathroom above this one so the ceiling was not in great shape – instead of patching it, my husband replaced the whole ceiling – looks better than the previous patchwork, for sure. Other than that, we didn’t have to do anything else here:
Basement Bathroom
Basement Bonus Room with Closet:
Basement Bonus Room With Closet
Basement Bonus Room (potential office):
Basement Bonus Room (Potential Office)
Other than those updates, all rooms had to be repainted and most doors had to be repainted. I’m the official painter so I took care of that. There were lots of holes left in the wall so spackle became my best friend during that time. And I think I’ve basically sanded my fingerprints off so if I ever get in trouble with the law they won’t be able to identify me! :-p So, tenants might not want to mess with me.. j/k – of course!
I’ll include the paint colors here in case you are interested. These are mostly the same paint colors we had when we lived there, except for the living room and bedrooms – I tried to find more neutrals. It’s hard to find a good neutral though – I know many of you out there will know what I’m talking about! There are lots of pink beiges and prison or mental facility grays lurking out there waiting to waste your valuable time! I digress – here’s the colors:
Main Floor Kitchen & Dining Room & one of the bedrooms: Bell Grove Buff (Lowe’s Valspar brand)
Main Floor Living Room & 2 of the bedrooms: Buffed Tan (Home Depot Behr)
Main Floor Bathroom: Au Lait Ole Lowe’s Valspar brand – don’t recommend this color – quite ugly)
Basement Living Area: Gold 3 (Laura Ashley Home brand LA709 at Lowe’s – they don’t sell it anymore but they will make some for you if you ask them for it.)
Basement Bonus Room with Closet: Promenade (Home Depot Behr brand)


