Pine Cone Wreath

I can’t really decide if this one is a Pinterest win or fail.  I’m still thinking about it.  I’ll let you decide.  The wreath I bought was falling apart and had faded after having it up for 6 years straight so I pulled all the berries off and was left with the wreath skeleton.  Which, when my husband saw it without the berries – he’s like, “Great!  We can just put that up!”.  Lol!

I had some pine cones left over from when I bought some cinnamon scented pine cones from Michael’s like 20 years ago – lol.  They had obviously lost their scent and had gathered so much dust.  They were perfect.  Also, I had my girls collect pine cones from the park as well.  So we had plenty.  I was trying to use stuff I already had or that was free.  I seriously considered making one out of all the kid’s mismatched socks, but thought better of it.  One day I’m going to figure out a use for those.

I cut the pine cones with a tree trimmer like tool.   Or is it a bush trimmer?  I have no idea – found it in the garage.  I guess you can tell I haven’t done any yard work.  Here’s a picture of it:

I actually thought I could use tin snips at first but no way.  These things are hard to cut – you need something heavy duty.  And some of the cuts aren’t going to go well so plan for that.  Then, I put them in a box and spray painted them red – actually this color from Home Depot.  I love red (it’s apple red):

I wanted to do multi-color but I didn’t feel like buying more paint so it’s all red which worked out because then I could just slop them on there however I wanted.  I hot-glued them on there – seems to be going pretty well so far.  We’ll have to see if they start falling off.

However, I think I could’ve spaced them out a little better – it looks like it has ears.  Maybe I’ll add a few more filler pine cones at a later date, but I ran out of spray paint because I used half of it for something else so for now this is going to have to be good enough!

I think it looks especially good from afar – at least that’s what I think.  Or maybe the Home Owner’s Association is going to write in the bylaws – no DIY wreaths – because of my creation.  We shall see.  Lol.

UPDATE: This ended up being a massive Pinterest fail. The pine cones kept falling off (I guess the hot glue wasn’t a good idea for summer time – it just melted and the cones kept falling off). I was too irritated with it to try to fix it that I just tossed it in the garbage. 🙁

Here’s a close up:

Mommy Independence Day

I think every Mom should celebrate Mommy Independence Day.  This should be a day on the calendar every year in which the Mom gets to celebrate all the things she no longer has to do for her kids.  I mean they do have National Peanut Butter Lover’s day and National Cheese Doodle day so why not?  The end of wiping bottoms would top this list of celebrations.  I know every time my kids have reached a milestone, I celebrated with a great big Hallelujah!  Here’s some of the milestones we can celebrate with glee:

1.) When the kids can put on their own shoes.  Especially when they can tie them themselves.  Of course, it won’t be perfect (laces will frequently be untied), but we no longer have to do it – we can bark at them to do it – woohoo!

2.) When the kids can put on their own clothes.  Especially when they can pick them out themselves and not look like street walkers (but I guess this might adjust again when they become teenagers where it seems the goal is to look like a street walker at times).  Not my kids, I’ll have to start picking out their clothes again if it comes to that.  My husband doesn’t even like them to wear the leggings that are so popular these days.  My daughter was horrified the time she tried to wear leggings with a “not long enough” sweater and my husband told her to put on some “real pants”.  :-p

3.) When the kids can go on the potty.  The downside to this is that you will spend way more time than you want to in public restrooms which is disgusting.  Every time you run an errand, you hear the dreaded, “Mommy, I have to use the potty!”.  Or, “Mommy, I need a drink of water!” which you refuse because you know it will lead to having to go to the potty.  In fact, I just stopped drinking water altogether when I became a Mom because I didn’t want to have to take the kids to the public restroom – Moms don’t have time to use the restroom.  :-/  And I am still traumatized by the time I took my kids to the restroom only to have my 2 year old dig in the little maxi pad trash can.  “Look mommy!”  I’ll never forget that – I’m sure we all have our own horror stories about public restrooms, right?  :-p

4.) When the kids can feed themselves.  And then, comes the even better milestone of them actually liking food!  Hallelujah!  My oldest started liking food at about age 8.  My middle child is starting also to like food and she’s 8 so maybe 8 is the magic number?  There’s hope everyone!  Of course, they still have their quirks with food but overall they are so hungry they will eat most things – woohoo!

5.) When the kids are able to make their own sandwich.  And then, comes the even better milestone of them being able to make their own sandwich without creating a beach (sandy beach made of bread crumbs) in the kitchen.

6.) When the kids learn to read.  And then comes the enjoying reading milestone.  This one is amazing!  Now, they can entertain themselves!  But, if you have multiple kids, they always seem to act at the lowest common denominator so I assume that you won’t get the full benefits of this until the youngest one really gets into reading.  Our youngest wants her siblings to play all the time with her and they can’t catch a break, so they only get to read at bedtime and when the youngest is occupied.  :-/

7.) When the kids are able to reach the sink to wash their hands.  This was a big one for me because I have had back problems and nothing seems to aggravate the back more than picking up wiggly kids who can’t seem to wash the soap off just right, etc.  “Mommy, my hands are still sticky from soap – I need to rinse them more!”.  I used to improvise and get down on one knee and let them use my other knee as a step stool.  Also not good for the knees though. :-p

Of course, we will always be mothers and we love being moms, but it’s ok to celebrate when our role changes, right?  I can’t help but celebrate.  Our role is constantly changing, but we can always take comfort in the fact that we are still Mom and our kids will always need us in one way or another.  I prefer they need us conversationally as opposed to, “Mommy, you need to wipe my butt!”.  😀

Life is like a box of board games

I’m channeling Forrest Gump in that post title. So, you have to imagine me saying it in that accent while sitting on a park bench holding a board game. If you’ve met me, this is not hard to imagine. :-p

I like to look at life with comedy because if you don’t laugh you’ll cry, right?  I prefer to laugh so hard I cry – sometimes in an insane-looks like I should be in a straight jacket sort of way – but whatever I take what I can get.  :-p

These are the board games I’ve identified so far in my life:

Trivial Pursuit: When you learn a new fun fact and then you decide to quiz your spouse or friend about it so you can tease them when they don’t know the answer (even though you just learned it yourself :-p). But I’m not that mean – I usually do admit to just learning it.

Chess: When dealing with family (sometimes-amirite? Other times, it’s just easy). BTW, I suck at Chess. :-p

Clue: When trying to figure out which kid did it. Interrogate each kid to make your determination. It’ll be hard because each one will point to someone else. You have to be good at reading between the lines or good at threats.  After playing a couple of rounds, was it Colette with the permanent marker in the kitchen? Ding Ding Ding – I win!  Or lose – however, you prefer to look at it.

Operation: When playing the family nurse.  Feels like this especially when trying to remove splinters and you have to use a needle to get it out.  Except instead of a buzzer going off, you have a kid screaming in your ear.  Bryon’s the nurse in our house – the kids don’t trust me – but I just think that’s because I don’t tend to emit a calm vibe most times..  That’s a nice way of saying I tend to freak out when someone gets hurt.

Charades or catch phrase: When you forget a word for something in conversation. Happens more frequently as we age, eh?  But charades is fun..

Jenga: when filling up the recyclables trash can over the top and trying not to be the one who puts the piece of trash in there that knocks the whole thing over. Then, you’re the big loser and get to take out the trash..

Hungry Hungry Hippo: Anytime Mom or Dad is eating something yummy and the kids are around..

Scattergories: When you have to spell something out quickly while on the phone..  My reservation number?  Sure!  It’s RSV1456.  Lady on the phone:  BFV1456?  No, that’s not it.  It’s R  like um, um, um, raucous.  S like um sleep deprived.  V like vino.  1-4-5-6.  Looking forward to staying at your hotel.  Thank you!

Monopoly:  That ones self explanatory except the bank wins everytime in real life.  :-p

Hot Potato: When you’re in a daily SCRUM status meeting at work and everyone is passing the ball from person to person to give status.  You want to get rid of the ball as soon as humanly possible and hope you’re not holding the ball when the music stops or people run out of patience in this case.  :-p

Easter Egg Hunt or Scavenger Hunt (not really a board game but a type of game): This is every day of my life as an adult.  Good thing we were taught when we were young that this is fun.  Oh yay – I get to hunt for my car keys again today!  What a fun game.  Kids, where are my keys?  :-p

This begs the question – does real life mimic the board games or do board games mimic real life? Deep thoughts.

Our First Real Estate Baby

We did so much on this unit that it’s broken down into several posts.  Since it took us 9 months to complete, we are calling it our first real estate baby.  Hope no one drops it on it’s head!  :-p

We decided to DIY an IKEA kitchen:
See post on IKEA kitchen (4 part post):IKEA Kitchen Planning Design

Ceiling Fans:
We had an electrician put ceiling fans in all the rooms.  See this post on Ceiling Fans:Ceiling Fans

Patched Holes from Ceiling Fans:
See post on patching the holes: Patching Holes

Repainted all walls, ceilings, window trims, & closet doors.
For the paint colors, see this post: Lighter Shade Of Gray

Doors:
Installed all new 6-panel doors throughout.

Opened up the doorway from the dining room to the kitchen:
See this link: Opening a Doorway

Duct Work:
We had to fix the duct work in the garage that was dented in pretty badly. We hired Morgner Heating & A/C to come out and put new duct work in.

Flooring:
We put new flooring throughout.  See this post on the flooring: Trying out Pergo XP in the Rental.  We actually used Allure Ultra in the kitchen because it is even more resistant to water.  They look so similar in color, don’t they?  You can hardly tell they are two different types of flooring.  We actually lucked out there because we didn’t even have a sample of the kitchen flooring – I ordered it online.  It’s called Sawcut Dakota.  We had Home Depot install it.

Bathrooms:
See this post on the bathroom gut: From Potty To Powder Room 03/2016

Repaired bathroom ceiling:
We had an issue while renovating where we had to repair the bathroom ceiling (after it had already been renovated.):Repairing Ceiling Water Leak

Shelf Liners:
I like to put shelf liners in the drawers and cabinets to protect them.  For some of the shelves (like the ones that are already damaged), I do permanent liners.  But for the new shelves, I do temporary, removable liners with no adhesive.

Here’s the before and after pictures of the unit:

Kitchen – Before
Kitchen – After
Kitchen – Before
Kitchen – After
Kitchen – Befoe
Kitchen – After
Kitchen Entry
Living Room – Before
Dining Room – Before
Dining Room/Living Room – After
Master Bedroom – Before
Master Bedroom – After
Second Bedroom – Before
Second Bedroom – After

No Before Picture for the Third Bedroom

Third Bedroom – After
Hall Bathroom – After
Master Bathroom – After

Ceiling Fans

In many older buildings, there aren’t any light fixtures in the center of the ceiling so people have to use lamps.  We have several units like this.  Slowly, we are starting to put in ceiling fans.  I’m a big “fan” of ceiling fans.  Personally, I think for rentals they are great.  People like to save on electricity and they like to air out their house or apartment so why not?

I love ceiling fans! I know they aren’t designer, etc. But they are functional. And I love functional! So, maybe it’s a good thing I’m in the rental market.  I feel like many pretty design elements aren’t functional and that’s disappointing to me.

Like the fact that everyone wants open shelving these days b/c it’s “in”. However that doesn’t sound appealing to me at all. You end up losing storage space b/c you’ll feel the need to put a glass elephant or a fake book there to make the shelf look pretty since everyone can see it. Then, you’ll have to shove your ugly things down in the basement where they are much less accessible. I prefer closed cabinets where I can house all my ugly things. :-p

Back to ceiling fans. Another reason I like them is because I like to feel the breeze inside – it makes me feel like I’m in a tropical location.

Ceiling fans also can provide plenty of light if you pick the right one. I like to get the ones with multiple light bulbs and no cover on them to filter the light. At least for rentals – I feel like the brighter the better. If they don’t like the bright light then they can have lamps in the room and use those instead. Or they can put softer light bulbs.  It’s their option. They had some fans on sale at Home Depot for $70 – what a deal!  About the same as a light fixture – depending on the light fixture.

Unfortunately, you sometimes have to butcher the ceilings a bit to get any kind of light fixture in but some patchwork and you should be good..  See this post on patching the holes: Patching Holes

Repairing Ceiling From Water Leak

So, while we were in the middle of our renovation of the first floor unit, the upstairs neighbor managed to leave their water on or something and it leaked down into our newly renovated bathroom.  EEEEKKKK!  I had a minor freak out, but luckily it wasn’t a plumbing issue, just a mistake.  We already had our plumber there doing work in the downstairs unit when this happened.  He went to take a potty break and called me when he saw the water on the floor in the bathroom.  So, he checked it out and found that there wasn’t a plumbing issue – someone must have left the sink on or something.  :-/

We ended up cutting out the drywall that got damaged and replacing it, then taped and mudded the area.  We had to put several layers of mud because this bathroom ceiling was skim coated heavily when we got it renovated.  The people who renovated it did such a great job on the ceiling that it was that much more disappointing that it got ruined because we are not expert mudders and tapers.

I have so much more newfound respect for people that do drywall, mudding, and taping for a living.  That is a serious skill that not everyone can master.  And it’s tedious.  If you’ve ever seen me spread jelly or butter on my toast in the morning, you would understand why I’m not so good at it.  I am very OCD about evenly spreading butter and jelly on my toast – every part of the bread has to be covered with about the same amount of butter and about the same amount of jelly.  And spreading mud on to drywall is just like that for me.  So it is extra painful for me to spread the mud on drywall.

And the worst thing about it is that the more OCD or perfectionist that you are, the worse things get.  Just when you think you’ll do one more swipe of the putty knife to make it more perfect and more even, you ruin it all and leave a big line in your smooth mud.  Really, I think what Hell would look like for me is taping and mudding with Mickey Mouse Club House blaring in the background (this was actually what I had going on the other night).  But I guess I shouldn’t give the devil any ideas (too late).

So, what happens when you suck at mudding is that you have to sand like crazy.  Sanding is equally as fun as mudding.  :-p  It’s all a very messy process.  It gets in your nose, eyes, hair, everywhere.  Imagine going to the beach minus all the fun and you’ve got it.

Here’s the steps we took:

1.)  Cut the dry wall to the studs.

2.) Put some fans in the room to dry out the area.

3.) Replace drywall.

4.) Thin layer of mud to fill in the cracks between the new drywall and existing drywall and all around to stick the joint tape to.

5.) Place joint tape (I recommend wetting the joint tape first – it sticks better).  I also recommend having all the joint tape cut ahead of time – before making the mud because it dries quickly.  Do one strip of joint tape at a time.

6.) Thin layer of mud over the joint tape and also applying some pressure to squeeze the mud from underneath the joint tape out. Do this all around the drywall.  We also had some damage on the wall itself so we just mudded that as well to fill in where the previous mud and paint was washed away.  We had to peel away some of the paint first (the loose stuff).

7.) Prime and paint the ceiling.  We had to paint the entire ceiling because we couldn’t find a matching ceiling paint.  Remember that ceiling paint doesn’t include primer in it so it’s important to prime first.

After the drywall was cut out:

Here’s what it looks like after the joint tape is applied and the first layer of mud.  The corner is done by folding the joint tape in half and putting it in the corner after you’ve put a thin layer of mud there.  They also sell a corner tool at home depot to help with the spreading out of the mud there though I’ve had mixed results with that – very mixed.

After a few layers of mud and sanding:

After about 5 layers of mud and sanding, then priming & painting:

It’s actually not perfect.  You can see that it slopes downward where our patch is.  But it’s the best we could do.  Not too shabby.

IKEA Kitchen Install Parto Quatro – Finishing Touches

If you are interested in reading part 3, it is here: IKEA Kitchen Install Part Tres – Cabinet Install

Now, it’s time for the finishing touches – filler pieces, cover panels, doors (can we just do without those? :-p), drawers, handles, toe kicks, crown molding, oh my.

Fillers
First, the filler pieces.  Originally, we were going to do a little less than 2 inches of filler on each side of the cabinets on the long wall until we realized the vent for the microwave (vents to the outside) needed to be within the 30 inch cabinet that is above the microwave.  Uh oh – you will say that often during this process.  So, we left no gap on one side of the cabinets (pantry side).  Luckily, the wall was very level on that side – miracles do exist and the pantry fit snug against the wall with no gap.  Hallelujah!  And the clouds did part then.

We then had to leave about a 3 1/2 inch gap on the other side, however, which wasn’t ideal but it was what it worked out to be.  It did help to keep the drawers on that side from hitting the window sill but we probably only really need a 2 inch gap for that.  Oh well, it looks fine, I think.  Nothing a little caulk won’t fix.  Just kidding – that’s been my answer to everything on this project.  You can use it too if it helps you sleep at night.

That side of the wall is very not level though so we read about this thing called scribing.  It’s some nonsense you do with a compass.  But, of course, we bought the jankiest compass because it was the only one Home Depot sold.  I do not recommend using a janky compass – get a good one that locks in place.  The one we got, kept moving as I was trying to draw the line.

This is how scribing works:  You cut the filler panel down to be about an inch wider than the gap between the cabinet and wall.  Then, you clamp (if you can, otherwise hold in place) this filler panel to the cabinet and make sure that the overlap of the filler panel and cabinet is the same at the top and the bottom (this will create a gap on the side that is against the wall on one end or the other).  Finally, open the compass to the same width as the overlap.  Keeping one side of the compass against the wall, you then draw a line onto the filler panel.  Use a table saw to cut along the line.  When you have a janky compass like ours, this line is not very reliable. Though it did work out ok for us – I just had to draw and redraw that line and we picked the darkest line because that meant I drew it more than once in that spot.  :-p

This scribing thing is a blast guys – especially when the other person is breaking their back trying to hold the panel in place while you look completely incompetent with a janky compass.  Note: explaining that the compass is janky doesn’t make you look any less incompetent – more like an incompetent person making excuses.  We couldn’t clamp our panel in place because of the position of the cabinet to the wall.  So, trying to hold the panel in place such that neither side moves (like when you breathe, for example) and you have to re-measure the overlap again and again is pretty comedic in an insane laughing out loud to yourself sort of way.  The last thing the compass scriber wants to hear is, “Doh!  It moved again!”.  You both will look like a bunch of incompetent, grouchy, nut cases – save yourself.

Here’s what I would recommend doing instead of scribing if your wall is pretty straight.  Find out the distance of the gap between the wall and cabinet at the top and the distance of the gap at the bottom and mark those two distances on the filler piece then get a straight edge and draw a line between them.  Be sure to tape this area that you are about to cut – helps to keep the wood from splintering.  Use a table saw to cut along that line.  Use the precision blade if you have it (helps reduce splintering as well).  It’s better to cut it wider than you need and then use a belt sander where needed to get it perfectly to size.  This belt sander thing works wonders.  Definitely buy a belt sander – do not try to sand by hand – trust me on this.  Caulk will fill in any gaps if it’s not perfect.  This is what we did on the other side instead of scribing and it worked out fine.  Friends don’t let friends scribe.  BTW, there’s no pictures of the scribing for a reason.  :-p

Just a side note:  I’ve never seen my husband look hotter than when he’s using a table saw.  Wind blowing back his hair.  Sand (i.e. particle board dust) blowing in his eyes.  It’s almost like we are at the beach, but not quite.  Something about a guy and his tools, right?

Next, we bought some 2×2’s to install the filler to.  First, we screwed the 2×2’s to side of the cabinet, then we screwed the filler piece to the 2×2 (from behind so you can’t see the screws from the front). We used 2 inch screws for this.  Drill pilot holes first, of course.

What it looks like from the top once the cabinet is installed (counter top will go on top of this):

This is what the final product looks like.  It’s not caulked yet so it’s not perfect yet.  :-p  Pretty uneven wall, right?  :-/

Here’s the filler on the upper cabinet (which we had to do TWICE because we got them mixed up and tried to use this one for the base cabinet – big woops!). It still needs to be caulked though:


On the short wall, we left only about an inch of space between the cabinet and the wall. We tried to put the cabinets directly against the wall so we could get out of making filler pieces, but the wall was not level so we scooted them over an inch.  The filler pieces were so skinny that we had to cut down the 2×2 into .75x.75 and then, we actually screwed the filler panel to the .75x.75 first, then screwed the .75x.75 to the cabinet (because otherwise, there wouldn’t have been space to drill if we did the other way around).  We used 1 inch screws.

The one problem we did have was that the .75 x.75 and the 2×2 weren’t completely straight so we did have to use shims in some spaces where we screwed, otherwise the filler piece would’ve been misshapen trying to conform to the misshapen 2×2.

Here’s a picture of the 1 inch filler with a shim in between the wood and the filler:

Cover Panels

First, cut the cover panel to size.  Make sure to use tape when you are cutting any of the IKEA products to reduce splintering.  Then, use clamps to clamp the cover panel in place.  Drill pilot holes and screw it to the side of the cabinet as per the instruction manual.

This picture is to demonstrate clamping – it’s obviously not the same cover panel cut above.

Doors

For the doors, first put the handles on.  We purchased IKEA’s handle measuring tool (orange rectangle in picture).  This is a must have.  Decide about where you want your handles and mark the holes accordingly.  Then, just put a level at the bottom and make sure the tool butts up to the level to insure it’s a the same spot for every door.  Then, drill pilot holes and screws and pop the doors in place as per the instructions.


Toe Kicks

These are easy and self-explanatory.  Just cut them down with a hack saw and clip them into place – this was the easiest thing we had to do.  However, once we get the flooring in place, we might have to trim them again length-wise.

Drawers

These took for-ever.  Give yourself enough time to do these.  It’s simple but placement can be tricky (bottom drawer gets placed differently than top so the manual can throw you off if you look at the wrong pages at the wrong times) and just time-consuming to put together and install.  Again, recommend getting the handles on those before installing.

Microwave Duct Work

To install the microwave was a bit of extra work because the IKEA cabinets are 15 inches deep and we bought a standard over the range microwave from Home Depot since they were having a sale around July 4th (weren’t we optimistic? we thought we were going to need it soon!).  We had to buy a special attachment from IKEA for the microwave which we forgot to get in the original order.  I don’t mind making extra trips to IKEA though – love that place.  😉  And my husband had to build around it with some wood which we cut to size in order to make a frame to attach the frame of the microwave to.  You can see it in the picture below.  The white horizontal piece on the bottom is the piece that IKEA gives you, but we added the wood on the sides on top in order attach the microwave frame.

Here’s the duct work my husband created because the microwave vents to the outside.  I suppose we could’ve also just had it vent out the front of the microwave, but this venting to outside was already there for the oven hood that was here and we didn’t want to waste that functionality.

Crown Molding (TBD)

We still have to put our little extra skinny strip of crown molding at the top of the cabinets. I’m sure that’ll be another adventure.  Will update when we get that done.  UPDATE: we decided not to do the crown molding on top.  We did add a strip above the sink because the under cabinet light was blinding.  Above the cabinets, there’s just a little gap between the cabinets and the ceiling.  We determined it actually looks fine..  You can judge for yourself in the final pictures below.

Counter Top

We went with Quartz in a light gray color. Luckily, we didn’t pick granite because the Home Depot countertop installers said they won’t do granite on IKEA cabinets since granite is heavier.

Interim pictures of cabinets:

Final pictures of the finished kitchen (woohoo – finally!):

For some before and after pictures, see this post:

Our First Real Estate Baby

Read on for the rest of the install:

IKEA Kitchen Install Part Uno – Planning Design

IKEA Kitchen Install Part Dos – Cabinet Assembly

IKEA Kitchen Install Part Tres – Cabinet Install

IKEA Kitchen Install Parto Quatro – Finishing Touches

To Show or Not To Show Is the Question

When a lease comes up and your tenant decides they are moving, you have to make a decision on whether you will show the place to new potential lessees before your current tenant’s lease runs out. I’ve always opted not to simply because I don’t want to disturb the current renters while they are living there, but here recently I thought maybe I’m being too nice and I should try to turn the unit over quicker. Big mistake!

We had a tenant that had mentioned they had fish when they applied to rent. We have a no pet policy, but we thought, fish? – no big deal. Well, when he said fish, he meant FISH and then some! But he always kept his place up really nice and he was a super nice guy and great tenant. Bryon had been over there and he’d offered us dinner before, etc. So, we thought, well maybe we could show the place at the end of his lease to see if we can find someone sooner – his place is always so nice.

Well, when people are moving – the place is not so nice. Boxes are going to be everywhere, etc. Moving is stressful, right? Didn’t think too much about that at the time. I asked our tenant in advance if we could bring someone by on Monday at 1pm. I told him on Friday so he would have plenty of notice. He was very nice about it – he’s a very nice guy like I mentioned. He even left us a frappuccino in his fridge when he moved – how nice, right?! And he’s given us brats for dinner (best brats I’ve ever had, by the way) before while we were fixing up a unit. I love tenants like that. Makes this whole landlord thing worthwhile. He did mention there might be boxes, but he’d try to clean the place up, etc. Ok, no problem.

I was planning to show the place to a granddaughter in her 20’s and her grandmother who was in her 60’s. They were very nice. I met them at the front of the building and walked them up. Rang the doorbell a few times. He’s not there which is fine. I told him he didn’t need to be there. Unlocked the door and we entered into the Costa Rican jungle. It was muggy as heck. There were aquariums all over the dining room floor – like 10 of them. The granddaughter says, “Does he have fish?”. I say, oh yes, he has fish but I didn’t look inside any of the aquariums – we just kind of walked right past them.

Already I’m having a bad feeling like we should turn around and walk out but there seemed to be no turning back – we had momentum. The grandmother was already moving towards the bedrooms. Then, the granddaughter gets ahead of her and we are all walking down the hallway towards the master bedroom. Granddaughter is in the front, then grandmother, then me watching it all unfold like we are in a horror movie. It actually felt like that for some reason. I think because I could almost feel their trepidation – it’s almost like they knew something that I didn’t.

Then, the daughter peeks her head into the master bedroom and says, “Is that a.. Is that a.. Oh my gosh I’m out of here. I can’t be in here with a snake.” Then, her grandmother screams, “SNAKE!!!!!”, and literally pushes me against the wall and runs past me. I run after them both because they have me sufficiently freaked out. They proceed to run their way completely out of the building and I am chasing after them apologizing. The grandmother was so nice. She was breathless and said, “Don’t you feel bad! Don’t you feel bad!”. And I just kept saying, “I’m so sorry…”.  They quickly walked to their car.

So, the moral of the story for me is: don’t show the place before the current tenant is out. They have no incentive to make it look nice and especially if they are in the process of moving and especially if they have a pet snake. It felt like we were in a bad movie when we walked into the place. Little did I know, we were on the set of the movie, Anaconda. It was muggy in there because he had so many aquarium pets. That was just one.

I’m sufficiently traumatized that I don’t think I’ll ever bring myself to show a place before the tenant is out again! And probably that’s for the best. Because also people don’t want to see how someone else has lived in the place they are about to rent anyway. They want fresh paint, no smells – they want it to feel like new. Real Estate lesson 101. Too bad we literally scared away the best potential tenant we’ve had thus far. Oh well, back to the drawing board.

One good thing, this tenant left the place spotless and with no problems. It was beautiful after he moved out which I was a tiny bit worried about after seeing all the aquarium pets. He even spackled all the holes in the wall from wall hangings.  Fish and reptile owners get a thumbs up in my book. Dogs and cats tend to do more damage. So, now it shows really well. If only I had just waited.  Unlike most horror movies, this one has a happy ending.  🙂

IKEA Kitchen Install Part Tres – Cabinet Install

If you are interested in reading Part 2, it is here: IKEA Kitchen Install Part Dos – Cabinet Assembly

And here is the part we’ve all been waiting for – the Install!  Because what good are kitchen cabinets if they are not installed, right?  We’ve been holding on to these suckers for quite some time now – it’s time to get them in place.

Measure twice install once (or whatever the saying is)

The first thing we did was measure everything again and draw all the cabinets and filler spaces on the wall.  This is important to do before you hang the rails.  You want to make double sure of the measurements.

Preparing to hang the metal suspension rails from IKEA

If you’re like us, then you’ll spend alot of time thinking about this before you do it.  The first thing you’ll need to do is locate and mark up where the studs are in your wall.  The rails are only about 84 inches long and one of our walls was 161.5 inches so we had to use 2 rails.  One rail we had to cut down a bit (using a hack saw).  Actually, we ended trimming a bit off of both of them so that the holes in the rail would line up with the studs in the wall, for the most part.

We did on occasion drill through the metal rail for a couple of the studs because we figured it’s better to get the rail attached to the stud than not and we couldn’t get all the holes to line up with the studs perfectly.  And we didn’t really care if the rail could move up or down (which is I guess what you can do when you drill through the holes – you have more room to adjust if it’s not level, etc.  We did have about a 2 inch gap between the two rails but it’s in the middle of the very center cabinet which is not going to be a big deal.  You just have to make sure that the two rails are level with each other.

It was actually hard to find the studs on one of the walls because there was soundproofing between the units so we ended up using magnets which would locate where the dry wall screws are (they usually screw the drywall in at the studs).  This worked.  We noticed that the studs were placed pretty far apart in some cases though (24 inches) – it was very non-standard. If you are having trouble finding studs, you can also just drill some test holes because you can tell if you hit a stud or not when you drill the pilot hole though this is not ideal because you could hit a pipe or water line (eeek!!).

So, on one wall, the base cabinet railing ended at dry wall and there was about 16 inches to the next stud which was bothersome so Bryon put some dry wall anchors at the end and since it is a base cabinet – most of the weight will be supported by the legs so it shouldn’t be a big deal, but we were concerned about the wall cabinets on that side.  Turns out when we went to hang the wall cabinets, there was a supporting structure going horizontal across the top so we didn’t have to worry – everywhere we drilled, we hit a stud/supporting structure.  Nice and secure.

These are the screws we used.  It actually took us a while to decide on screws.  We wanted the screws to go about an inch and a half into the studs and we had several layers of drywall and soundproofing to get through.  So, we picked these 3 inchers:

Now, on one side, we have a little 12 inch cabinet between the cabinet and oven which doesn’t bode well with the metal hanging rail because the metal hanging rail was only barely going to reach one stud at the end of it and that would not be much support. The metal hanging rail also won’t fit behind the bottom of the pantry in order to reach another stud. The pantry is actually hung on the top rail but it doesn’t have that big of a gap all the way down. So, Bryon got an upper body workout with his hack saw and hacked off the lip of the metal rail so that we could get it into at least 2 studs to support that 12 inch cabinet. Here’s an example of this:
20161205_190957

Honestly, I don’t know how he did that. I couldn’t even be in the same room while he was using the hacksaw on the metal – the sound of it was like nails on a chalkboard times a thousand. Even upstairs, I could hear it and my hair was standing on end and my teeth were clenched together. It just made all my fillings hurt for some reason. Much respect to him for doing that.

Hanging the metal suspension rail

So, next, you want to get the metal suspension rail actually hung. The top of the rail should be at least 6/8 inches from the ceiling. We wanted our cabinets to go all the way to the ceiling so we contemplated ignoring that rule and hanging the metal suspension rail all the way at the ceiling but then we thought that the cabinet doors might not open. We seriously debated this and tested this for hours – this is part of our problem – indecision.

Ultimately, you need that 6/8 inches in order to have room to hang the cabinets on the rail itself, but there’s a way you could forgo that if you want to do the extra work of first hanging the metal cabinet clips onto the rail and then someone holds the cabinet up while you screw the cabinet clip into the cabinet. This would probably work if your ceilings were level but our ceilings weren’t even level so we didn’t bother trying – the doors probably wouldn’t open and since that’s important for cabinets we decided not to go that route.

We also figured one of us would break our back trying to do this so let’s just do it the easy way and if we need to add some crown molding to the top later, we can.  We hung them exactly 6/8 inches down which isn’t going to leave much space for crown molding, but we got something really skinny and we’ll have to sand it down in places.  Maybe leave a little more space if you can.  We left about 17 inches of space between the wall cabinets and the counter top which is on the lower end of space so we didn’t want to eat into that space anymore than we had to.  Ideally, you want at least 18 inches of space there, but I think more than 15 is considered acceptable.

UPDATE: Looking back, we should’ve used the IKEA crown molding and left space for that.  The crown molding that comes with the GRIMSLOV cabinets is only about .5 inch thick, but they gave us the wrong molding – the one we got was 1.5 inch thick on the skinny side and we thought that would be too thick since we already had limited space above the countertop.  If we had gotten the right molding, we totally would’ve used that.  🙁  But we did find something that would work at Home Depot that is equally skinny if not skinnier and if at some later date we choose to, we can always add that.  I can have the paint matched at Home Depot by bringing in a cabinet door and paint it.  It’s just extra work that we wouldn’t have had to do if we had gotten the right molding in the first place.

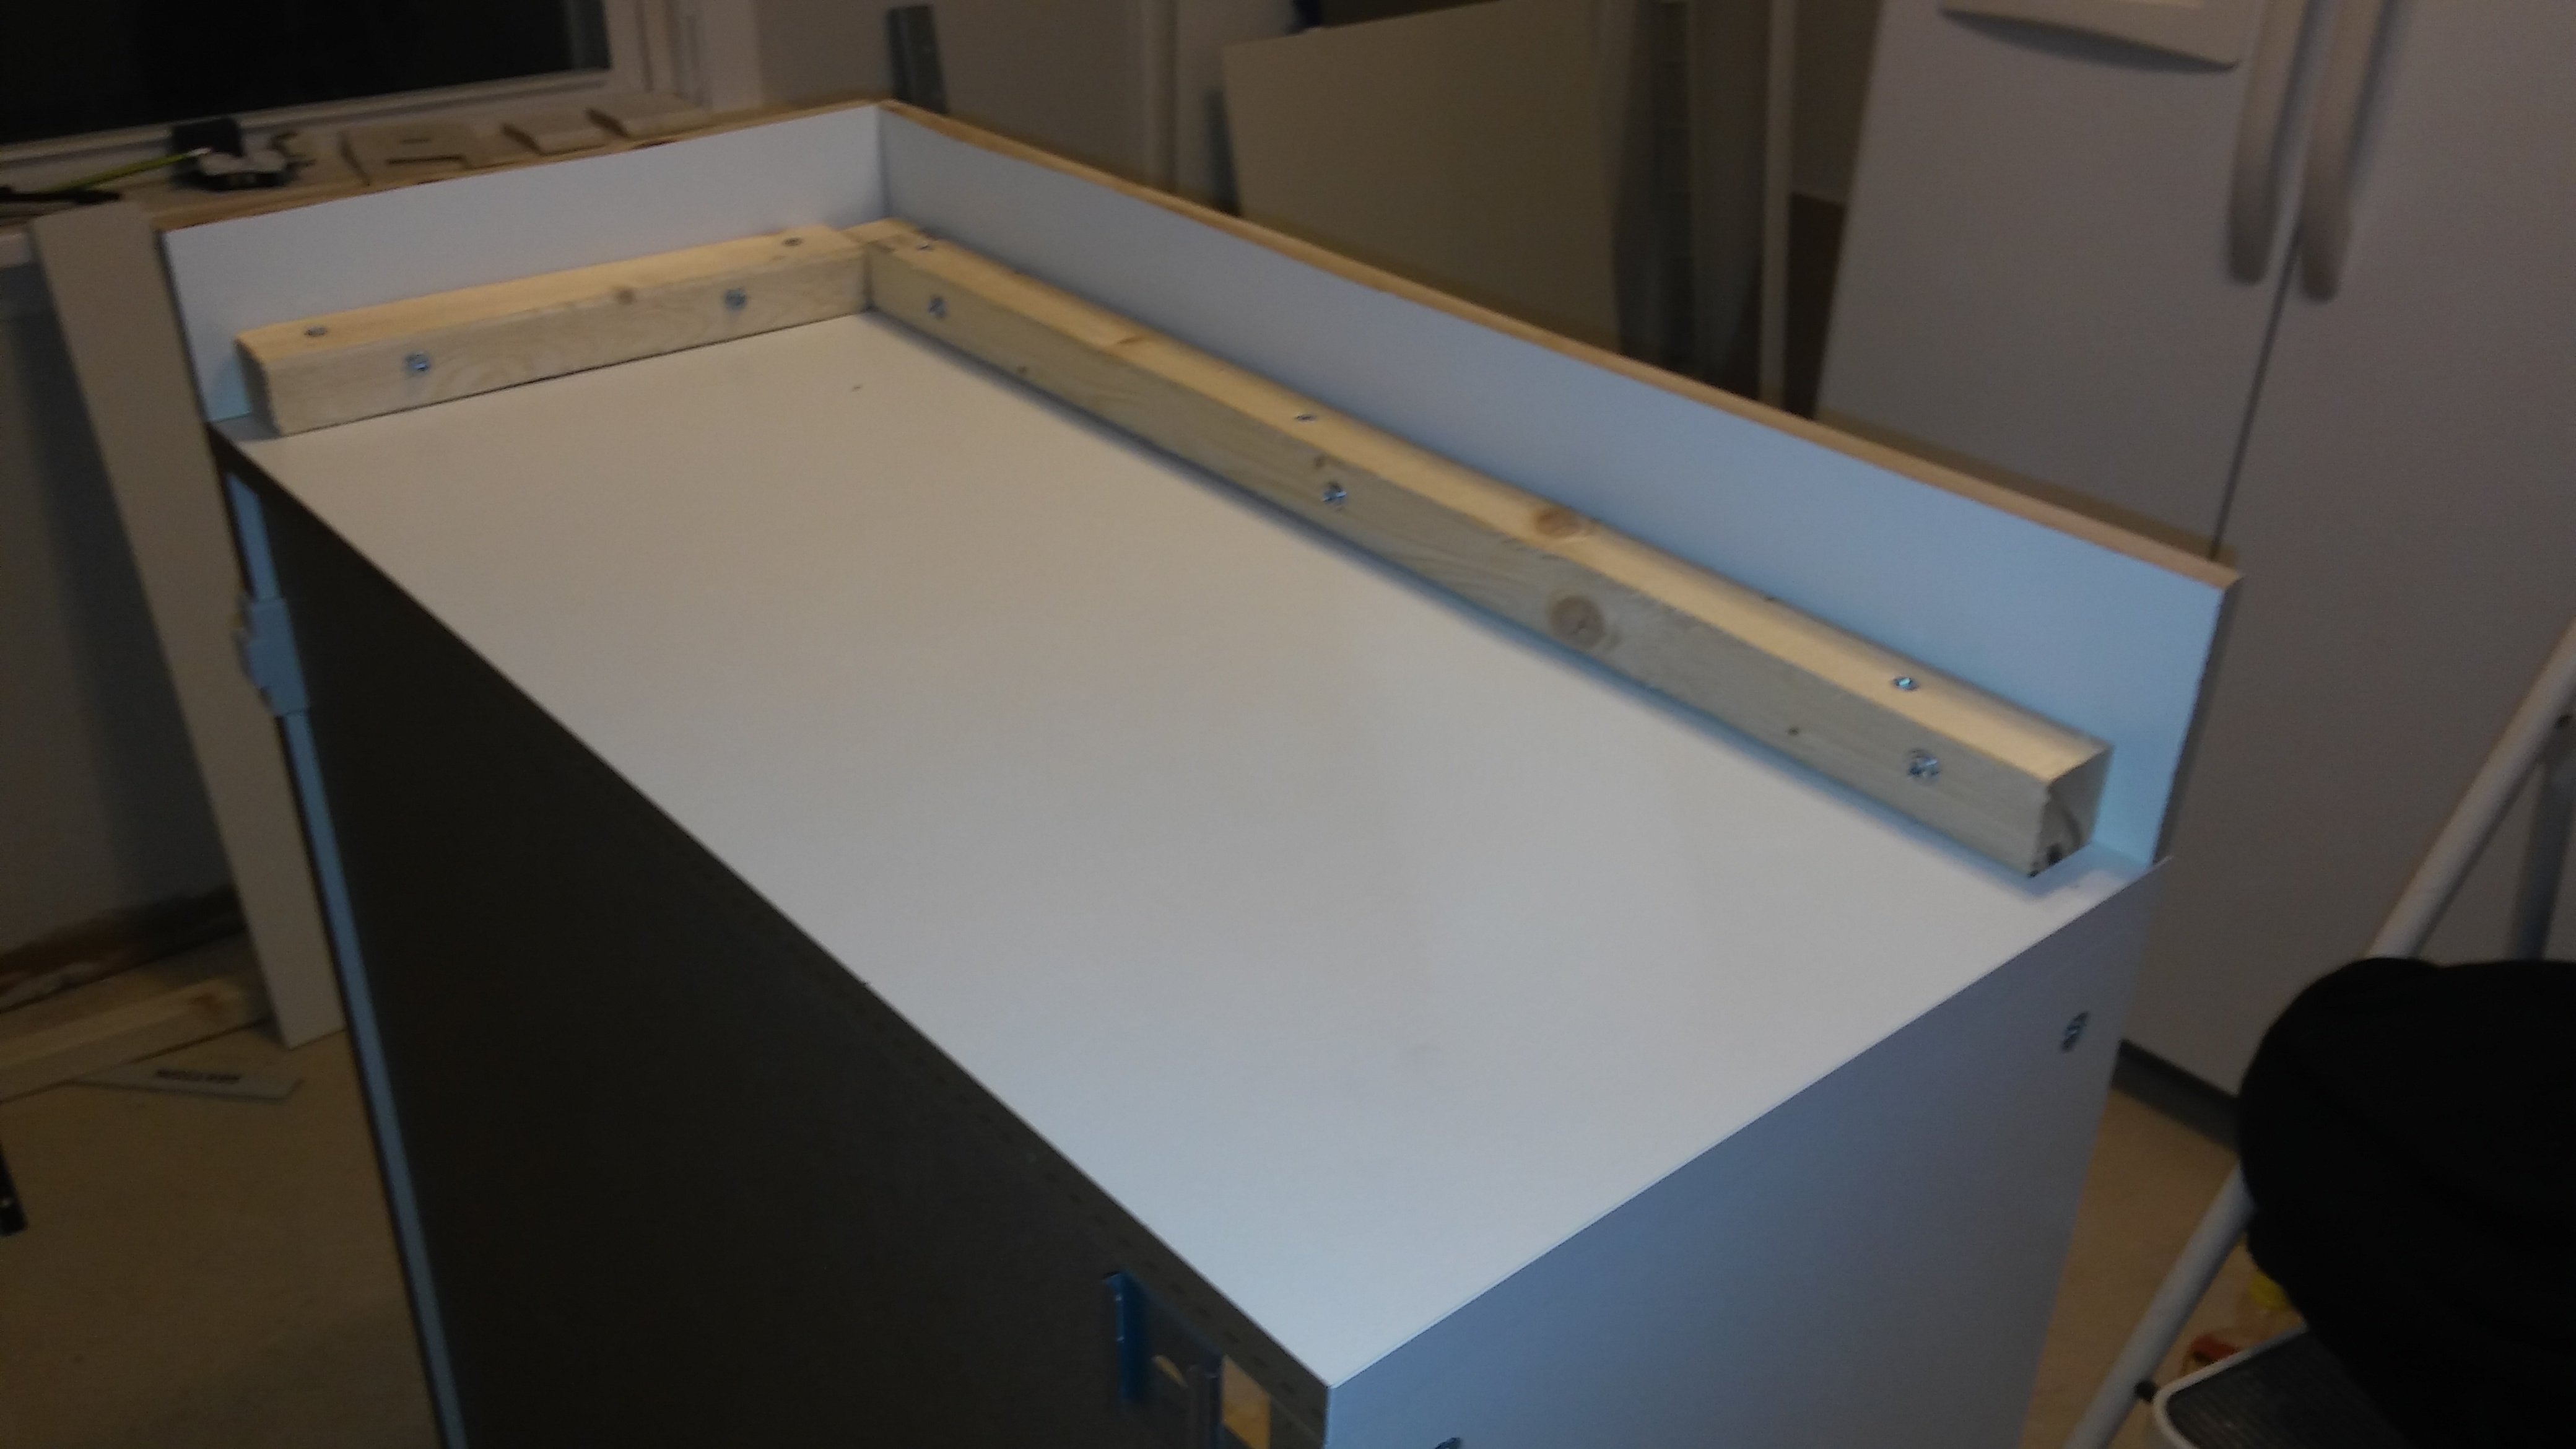
You’ll want to draw marks along the wall using a square 6/8 inches down (or whatever distance you choose) and hang the railing at the lowest mark – get it level. Then, draw a line on the wall along the bottom of the metal suspension rail. Drill pilot holes into the studs in the center of the hole on the metal suspension rail. Put your screws in most of the way but not all the way. Make sure your rail is perfectly in place and level. Place the IKEA “washers” on the screws and then drill the screws all the way in to tighten. Boom! You’re done! With the rail, that is.. So, we put screws in each of the studs and then put some dry wall anchors in between those because IKEA recommends having a screw every 12 inches.

For the bottom rail, we followed the standard IKEA gave in the manual as far as the height.  I can’t remember what that height is right now but I’ll try to add it here later.  We debated going lower to have more space between the wall cabinet and base cabinet but ultimately decided to just use the standard because we wanted to make sure to have space for the legs (though we did saw the legs down to fit them underneath the pantry, it would be extra work to do that to every leg) and also to make sure the counter wasn’t too low.

Here’s some pictures of our rails (please ignore the mess):

On the short wall (base cabinets):

On the short wall (wall cabinets):

On the long wall (on this rail hangs the base sink cabinet and the 36 incher next to it):

On the long wall (this is the rail for the 12 inch cabinet – the only thing that hangs on it):

On the long wall – here’s the 2 wall cabinet rails side by side with a tiny gap in between (couldn’t get the whole rail on the other side in the same pic):

Hanging the cabinets

Boom! We thought we were done.  We went home on Cloud 9 thinking we accomplished ALOT.  But once we went back and started hanging the cabinets on the rail on the long wall, there was a gap between 2 of the cabinets that we couldn’t get rid of. And this is where we seriously contemplated quitting, y’all. It’s really hard to go from thinking you are done with the rails to having to start over. This was our lowest point where we had to muster all our emotional strength and spirit. If you are installing an IKEA kitchen yourself, you are guaranteed to have one of these moments at some point. Don’t give up!!! Maybe take a break and have a glass of wine or a cookie, but don’t give up! I kept thinking of all the people I could call and even dreamed of selling the building altogether.  The thought of taking the pantry down was enough to defeat us. That sucker is heavy and there is very little wiggle room to get it off in that space.  And we had already leveled it and put some extra supporting structure underneath it – 2×4’s (which we ended up not doing later – it doesn’t really need it).

Turns out, the wall was uneven and the metal rail wasn’t exactly flush on the long wall. We needed to add shims to the left side of the wall and pretty significant ones at that to get it to be flush with the right side of the wall. We basically shimmed the entire left side of the wall up to the halfway point. Starting from the mid point, we put smaller shims and they got progressively thicker as we reached the end of the wall. We also had to take the pantry out which we were trying to avoid and we ended up putting that in last after we got everything else to line up without gaps.

The pantry is hanging on the rail but we also have it supported by 4 legs. It’s just so hard to get it off and on the rail that we were really trying to avoid that so putting it in last after we made sure there were no gaps was the smartest option.   The pantry would not fit in the space we had with the legs on it so my husband sawed down the legs so that we would be able to get them underneath the pantry.  Instead of being 4 inches, the legs are about 2 1/2 inches underneath the pantry.

Here’s our pantry – be sure to install the cover panel on there (as shown here) before hanging the other cabinets since it’s full length.  You’ll have to cut a notch out of the cover panel so that the metal rail can run behind it, but make sure you make this notch deep enough (length-wise) or you will have a hard time getting the pantry off of the metal rail like we did.  :-p  This notch will be hidden by the cabinet next to it so it really doesn’t matter too much how it looks.

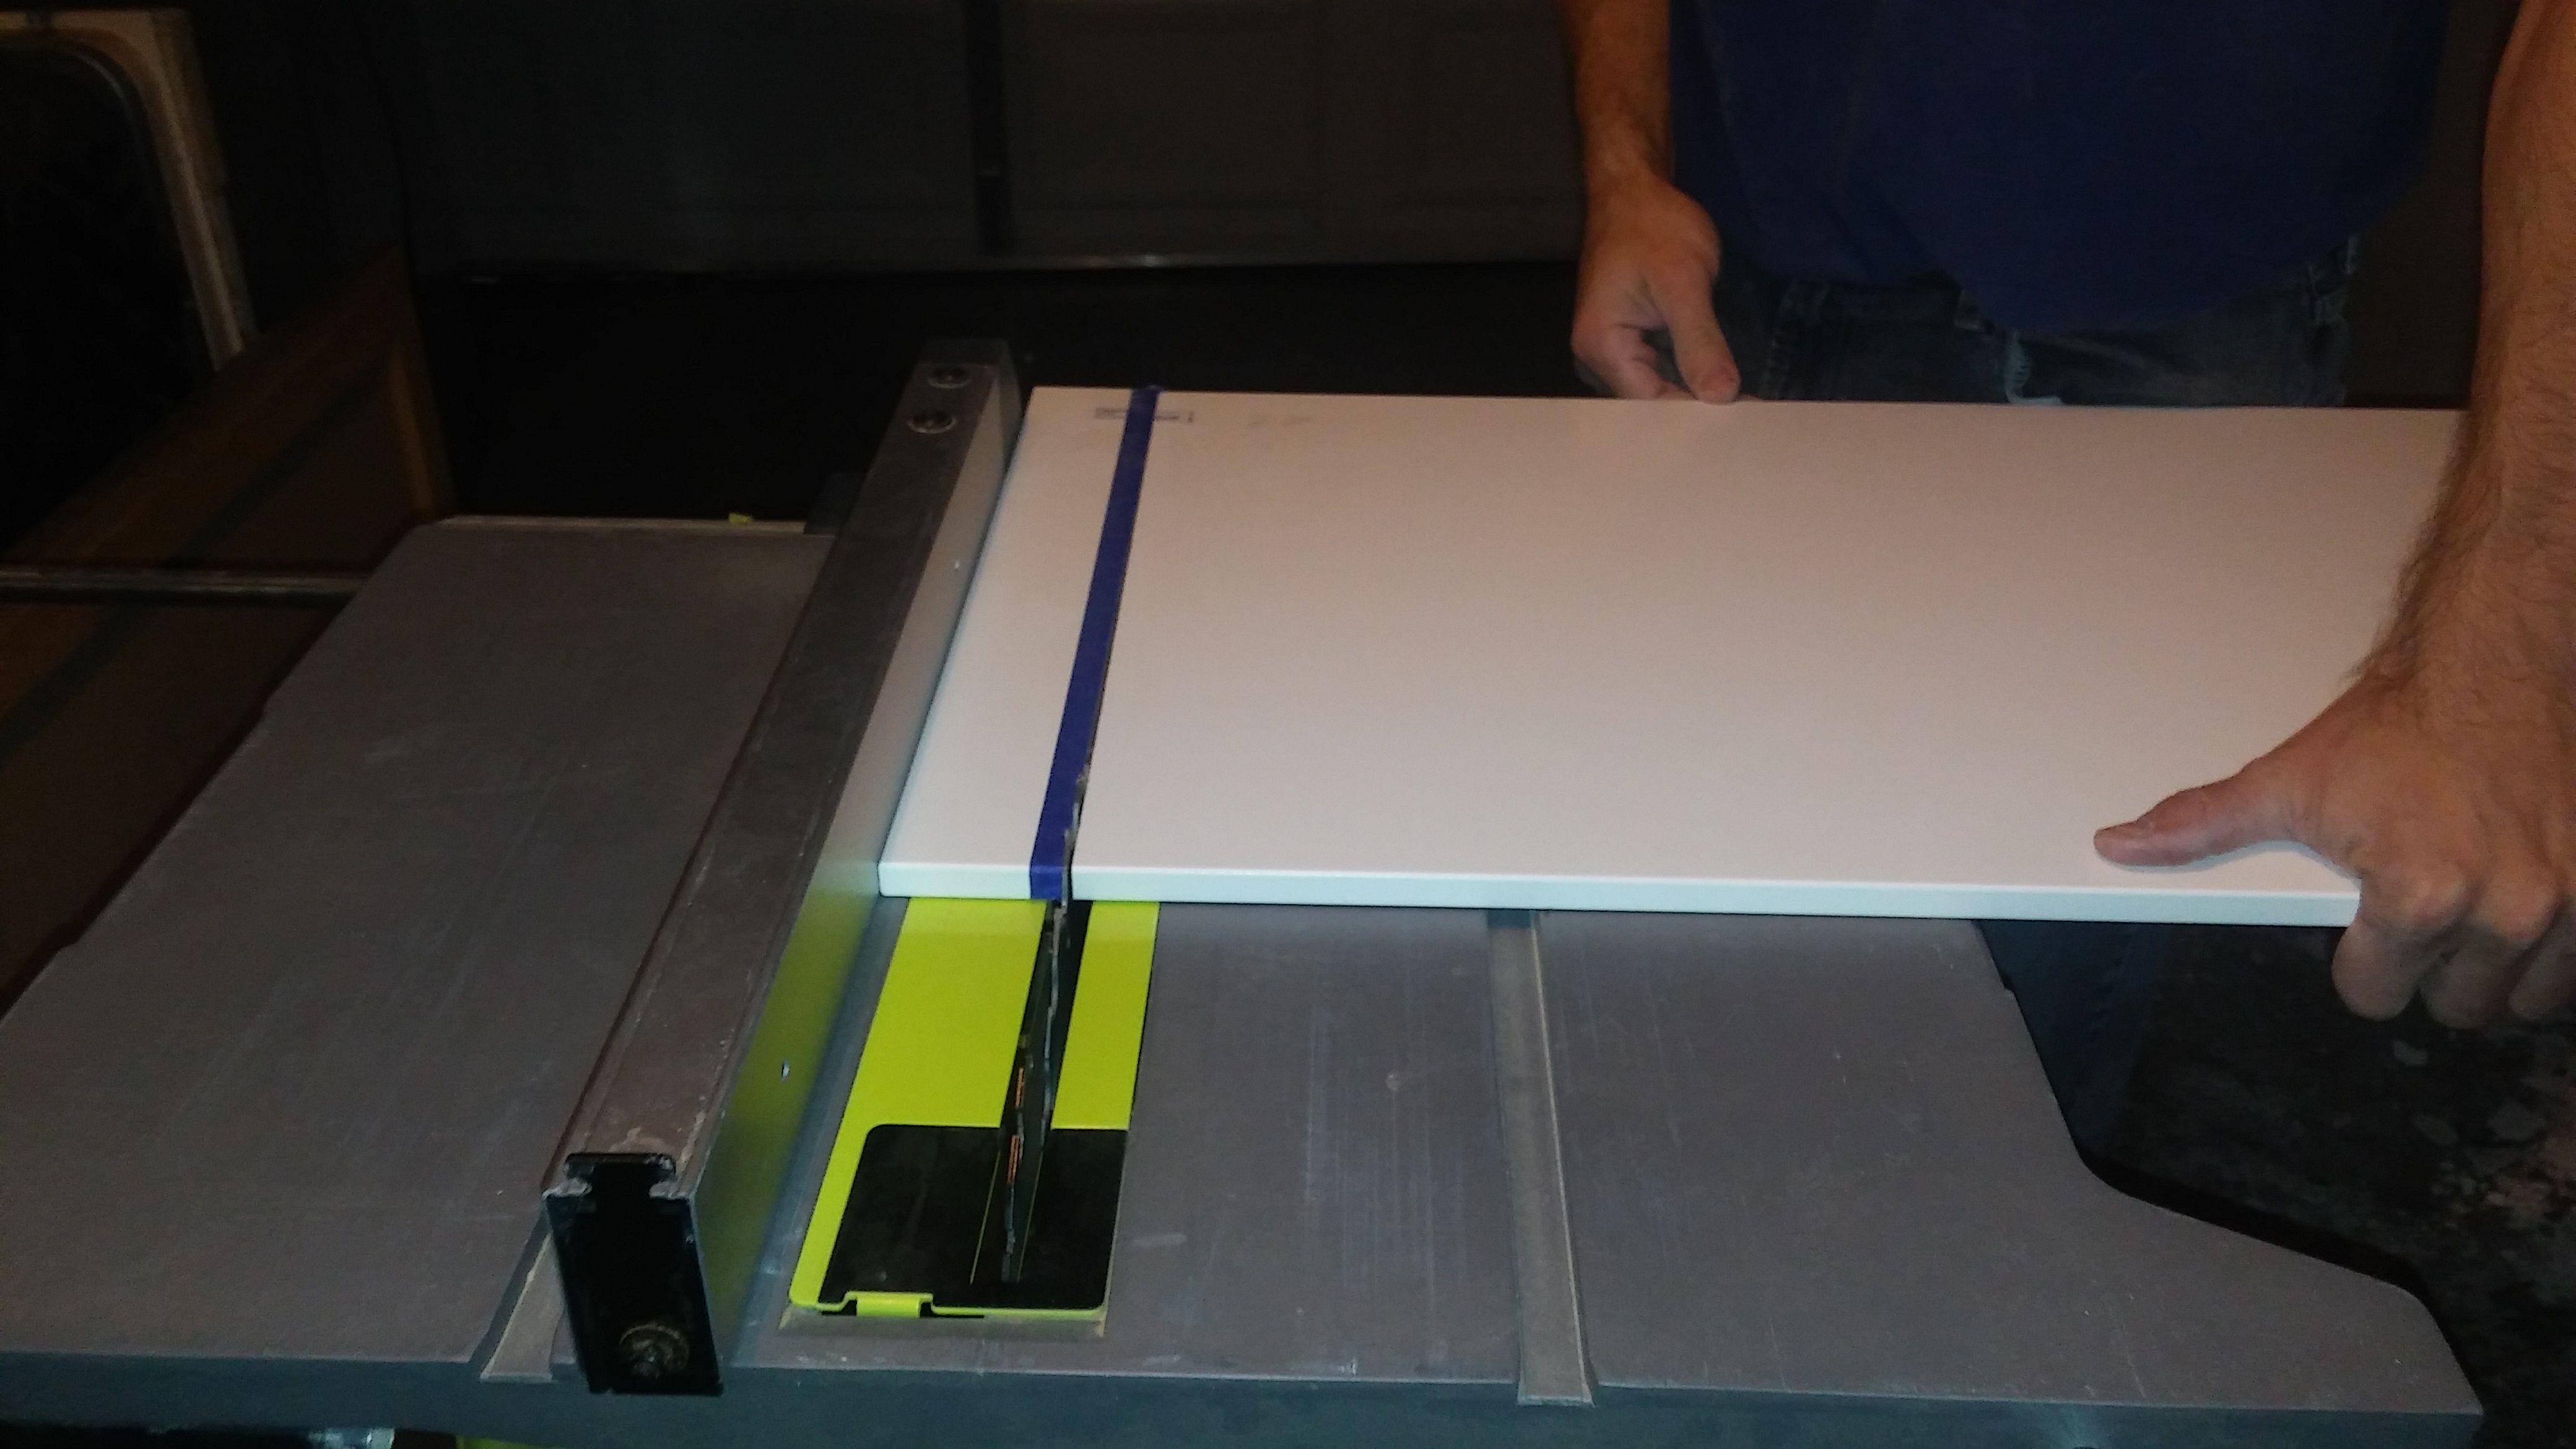
Panel between dishwasher and oven

We had to add a panel between the dishwasher and oven because they are right next to each other – deciding where this went was tricky because after we measured our oven, we found out that it was actually 30 1/8 inch wide which is more than the standard 30 inches. It was 29 7/8 at the top, but 30 1/8 inch at the bottom in the back. This is something to beware of when you are doing your measurements. So, we left a gap of 30 1/4 inches for the oven and exactly 24 inches for the dishwasher since these are usually a bit smaller than 24. I read up on this before we actually made this permanent because I wanted to make double sure and found that many contractors have been burned (not literally) by the oven spacing –  so leave 30 1/4 inches just in case.  We did and we are very happy with it.

IKEA sells a special panel that is used specifically to support the counter between the dishwasher and the oven. It’s a 26×36 cover panel. We thought it was 1/2 inch thick but turns out it’s 5/8 inch thick so then we needed 1/4 more inches for the oven so this left an extra 3/8 inches that we weren’t accounting for on the wall cabinets (trying to keep everything symmetrical).

This is how we secured the panel to the wall:

This is how we secured the panel to the floor on the dishwasher side:

Adjusting the cabinets to make sure symmetric

We decided to buy another cover panel to put on the other side of the 30 inch cabinet that goes above the oven which would make that space 31 inches wide and then the space below for the oven and panel would be 30 7/8 (30 1/4 for the oven + 5/8 for the panel) – very close – no one will notice 1/8 inch off. And we figured it looks better anyway for the cabinet above the oven to have cover panels on both sides (as opposed to just one side) – not that it mattered though.

Well, this shifting around and adding more space for the oven caused us to have to remove the bottom rail and move it over a bit – about a half an inch. I had the countertop people coming to measure so we needed to have this panel done between the dishwasher and oven. We didn’t end up getting the bottom cabinets scooted over half an inch but I signed off on a paper, in blood, that said we were responsible for moving the cabinets over half an inch. Normally, they don’t do this but I offered to sign in blood.  :-p

Holes for plumbing and electrical

My husband had to cut out the holes for the plumbing a little wider to accommodate the half-inch which he was super bummed about because the holes were miraculously perfect the first time (when things are miraculously perfect it’s usually a sign that something else is wrong – immediately start looking for the something else :-p). Now, the holes for the plumbing look more like tiny butts – perfect butts though so can’t complain.  This is why you want to dry fit everything before cutting the holes out.  We bought outlet boxes that have a lead screw on them so that they adjust in and out – since the cabinets have a gap between the wall and cabinet (due to the metal hanging rails).

We had to cut a hole out of the cabinet that’s above the microwave to allow for the vent which vents to the outside.  Here’s a picture of that (we just narrowly avoided that cam – this is one of the reasons we left no filler on that side of the pantry):

Leveling the cabinets and putting on the legs

You’ll want to put a level on the base cabinets and adjust the legs to make sure they are level.  We discovered that with the drywall around the pipes, the wall stuck out too much at the bottom and made it impossible to level the base cabinets around the sink area.  So, we had to cut the dry wall out and use aluminum (won’t rust) sheet metal around the pipes because it’s thinner and more flexible and wouldn’t cause our cabinets to stick out and not be level. We had to also cut out some of the drywall further down (behind the 36 inch cabinet) and use the sheet metal because the pipes were causing it to stick out too far there also and causing our cabinets to not be level.

You’ll want to have all the cut outs for plumbing and electrical done before securing the cabinets to each other, as well.

Undercabinet lighting

Another tip, if you are using IKEA undercabinet lighting – be sure to put the cables in place behind the cabinets before you start securing them together, etc. You will have to pull them out a bit to get cables in there and sometimes they have to go on either side of the pads on the back of the cabinet – you’ll want to make sure you have that figured out and get them in place. You don’t need to have the lighting in place necessarily but the cables, for sure.

NOTE: we decided not to go with IKEA undercabinet lighting because of reviews and backsplash unknowns with the wires coming down from behind the cabinets (there’d have to be gaps in the backsplash or the backsplash would have to be tiled up to the light, etc – too non standard to find any information about it and the electrician wasn’t familiar with IKEA products).  So, we are just going to hard wire some undercabinet LED lights we got from Home Depot.

Screw cabinets together

Now, it’s time to screw the cabinets to each other. First, you want to clamp the 2 cabinets together. Then, you drill the pilot holes and use the screws given to attach the cabinets together. Then, you want to use the gray clippy things to lock the cabinet in place on the rail – this prevents it from moving around.

I just ordered a quartz countertop and backsplash from Home Depot so we are getting so close I can taste the first dish we will make in this kitchen! We will have to test out our work, eh? Heck, I’m thinking about moving in! Too bad it’s a rental and not our house! :-p  Flooring company isn’t coming until Jan. 19th so have a while to wait yet.

More pics:

Read on for the rest of the install:

IKEA Kitchen Install Part Uno – Planning Design

IKEA Kitchen Install Part Dos – Cabinet Assembly

IKEA Kitchen Install Part Tres- Cabinet Install

IKEA Kitchen Install Parto Quatro – Finishing Touches

9 Things That Will Turn Your Child from a Gizmo Into a Gremlin

Whoever created the movie, Gremlins, must’ve been a parent. It’s the perfect analogy for children. Ever look at your child one minute and they are sweet and cute (Gizmo), then the next they are foaming at the mouth and having the biggest tantrum ever (Gremlin)?  I call this the Gizmo to Gremlin transition.  It happens in the blink of an eye.  I’m compiling a list of the things that cause it so I and others can be more aware..

9 Things that will turn your gizmo into a gremlin:

1.) Go on a playdate without a snack/drink or go anywhere without a snack/drink. They will claim to be dying of thirst the second they realize you have nothing for them to drink. You will end up buying a $3 water somewhere.  If you are on a playdate at a friend’s house, they will eat everything in your friend’s kitchen or complain the entire time about being hungry.  You may end up clamping a hand down over their mouth and making a bad impression with said friend.  :-p

2.) Let them stay up past midnight.  In the Gremlins movie, you aren’t supposed to feed them after midnight, but in real life – it’s don’t let the kids stay up past midnight – you’ll regret it.  We frequently let our girls sleep together on the weekend and next thing you know, they are each breaking down in turns and your whole weekend is consumed by tears.

3.) Wake them up from a nap. The phrase never wake a sleeping baby applies to everyone: never wake a sleeping baby, never wake a sleeping toddler, never wake a sleeping preschooler, never wake a sleeping husband.

4.) The witching hour: anytime between 4pm and 6pm.

5.) Serve them anything homemade.  I no longer answer my kids when they ask me what’s for dinner.  I tell them that’s a loaded question!  Or I’ll tell them it’s something frozen that I warmed up b/c they trust that stuff more than they trust my cooking skills..

6.) Tell them you are going to Home Depot.  They hate Home Depot, mostly because they will usually end up getting barked at by some old, grouchy person that thinks kids shouldn’t exist in this world.  But some are nice and give them lollipops so it just depends.

7.) Tell them it’s time to clean.  Although, now that they are older, I find that I tell them all to clean just to get them to play quietly together.  Somehow telling them to clean, causes them to play nicely.  Not exactly the desired response, but close.  Sometimes, as a parent, you have to improvise and be flexible to get what you want.  :-p

8.) Tell them no at the store.  I like to say, we’ll add that to the Christmas list.  If they push further, I pretend to add it to a list on my phone.. This applies more when they are little – now, for my older children I say no incessantly at the store – it’s like I’m making up for all the times I couldn’t say it when they were little.

9.) Tell them to share.  This evicts the worst response.  It’s like you are asking them to set their toy on fire or something.  Telling them to take turns isn’t much better – they will watch the clock like a hawk and nag you incessantly to see if it’s time yet.

Anyone else have any other things?  My kids are 4,  7, & 9 so the list might’ve been different when they were younger.. No, wait, it was definitely different and more exhaustive when they were younger. I used to say – it’s so hard being little – all the time because it seemed like EVERYTHING upset them.  Seriously, you could say, “We are going to the park!” and they’d get upset.

And gremlin kid after they’ve eaten all the snacks out of your friend’s pantry:

And now I’m going to flip the script down here and write about times when Mom turns from Gizmo to Gremlin:

Here’s Mom “happily” at the computer paying bills:

These are the things that turn Mom into a gremlin:

1.) Talking to me after bedtime.

2.) Scream mommy from another room over and over again and expecting me to come running like I’m some kind of butler.

3.) Leaving the house without shoes on or with only dress up shoes on and not finding out until we are at the destination.

4.) Incessant fighting.

5.) The sound of the bead bucket hitting the floor.

6.) Bouncing around so much upstairs that it sounds like a Jumanji style stampede is going to come through your ceiling.

7.) Having to repeat myself for the 5th or 6th time.

And gremlin Mom (angrily stuffing face with cookies while offering the kids none):