I was recently in charge of a Girl Scout meeting for my oldest girl scout to help the girls earn their Philanthropy badge. Well, me and my daughter were in charge but you know how that goes… 😉 We needed an activity for the girls during the meeting and I felt like this giving jar was the perfect idea. This jar is a place where they can save up their coins to donate to a charity of their choosing. We talked about what charities already exist out there and about how a dime doesn’t buy much here but in a third world country could buy a child a breakfast of oatmeal and such. I also had some magazines and had them cut out some wants vs needs and glue them to poster boards but I would say they were more excited about the jars.
What you’ll need:
sponge brushes (to paint on the mod podge) Found a pack of them at Wal-Mart for cheap.
mason jars (pint-sized – got from Wal-Mart b/c they had some that didn’t have any engravings on them)
tissue paper (multi-colored)
mod podge
card stock (multi-colored for the lids)
box cutter (to cut the slit in the lid for the coins)
The girls were excited to make their jars. I cut the circles out of tissue paper beforehand. At first, I bought a circle punch from Michael’s and that was worthless. It kept tearing the tissue paper and not cutting then eventually broke from too much use (or frustration on my part?!?!) so I had to abandon that idea. In the end, I found the best way to cut out the circles was to fold the tissue paper over itself multiple times and trace a 1.5 inch circle which I first cut out of card stock (using my whole punch when it was still alive). Then, I traced that on the folded tissue paper and cut out multiple circles at a time that way. You will need some strong scissors – I used the kitchen shears b/c I wanted to cut as many circles as humanly possible at one time.. :-p They don’t have to be perfect – no one will notice..
First, you paint mod podge on a section of the jar using a sponge brush (it dries quick so just one small section at a time), then stick the circles to it, then paint the mod podge over the circles and repeat. It is pretty easy. Just keep overlapping the circles so that every inch of the jar is covered. For the top, I just cut a circle out of card stock and used a box cutter to make the coin slit in it. Wallah! Pretty cute, right? You could also just use it for a pencil holder or you could do the same thing with a vase from the dollar store. Whatever you want. I need to make one using different colored tissue paper for my office..
Here’s a link to the video that shows you the tehnique:
And here’s a website where I initially found the philanthropy badge information and the common sense jar. I kind of combined the two ideas:
Because I love magnet and tack boards so much, I decided to update this hallway in between the kitchen and the office into a place where I could put the menu for the week, to do lists, hang the kids artwork, homework, Christmas cards, pictures, etc. Why not? I already had the magnet board collage on the one side (as per earlier post), but I made the 4 tack boards more recently (over Christmas break) using different colored yarn to match the magnet boards and hung those up using french cleats. My husband actually did the hanging and boy was he excited and not in a good way!!! j/k – sort of :-p I actually made the tack boards instead of putting together Christmas cards to send out (which would explain my lack of Christmas cards received) b/c I’m ADD like that and I REALLY enjoy doing new projects when I’m supposed to be doing something else – isn’t it strange how that works? Anyone else like that? Some pics below:
Things you’ll need:
Extra large heavy duty box (Home Depot – around $5)
7 inch mirror (Joann’s – around $3)
6 packs of spoons (dollar store) – you may need more or less depending on size of your mirror
hot glue gun and glue sticks
buttons (Joann’s – bought a jar of white ones for half off $3)
Cut large circle out of the card board box.
The diameter for mine is about 22 inches. I made a large compass by using a pencil, some string, and a tack. I tacked the string to the center of the circle and tied the string around the pencil at about 11 inches, then I drew the circle, keeping the string taut. It doesn’t have to be perfect – this project is very forgiving. Cut the circle out with some strong shears.
Glue mirror to center of cardboard using hot glue.
Cut spoons up. This doesn’t have to be very precise either. Mine popped off in random spots. You could even break them too if you wanted.
Glue spoons on cardboard starting at the outermost edges and working your way in towards the mirror. See my spoon spacing in the pictures below. Once you get closer to the mirror you may notice some asymmetrical-ness however you can just glue some extra spoons in places if you need to fill in any gaps. It is pretty forgiving.
Pull off the glue strings.
Spray paint the whole thing except the mirror. I just taped some paper to the mirror to cover it so it wouldn’t get spray painted. The edges did get a little bit of paint splatter on them but I covered the edges with buttons so it didn’t show too much. Pull off any other glue strings that showed up. It’ll take a few rounds of spray painting to get everything fully covered and you’ll have to hit it from several different angles. I used Rust-Oleum Apple Red from Home Depot – the kind of paint that says it adheres to plastic.
Lay out your buttons the way you want them and hot glue them on. I put them half on half off the mirror to cover up the spoon handles and paint splatter. Here’s some pictures of the progression.
Lastly, I hot glued two large saw tooth hangers to the back of this and planning to hang with 2 dry wall screws. We’ll hope that holds it b/c if it doesn’t I will be having myself an adult tantrum! :-p UPDATE: I had to glue the saw tooth hangers on with wood glue – the hot glue didn’t hold – luckily only one of the hangers came off and the mirror was still being held up by the other hanger – whew!
Actually, this project is quicker than you think if you don’t do the trial and error like I did. I originally tried to make this ombre where you had red in the middle, then pink, then light pink then white spoons, which meant I had to paint each spoon individually with acrylic paint – I do not recommend this! It didn’t work for me. First of all, I would’ve had to paint each spoon twice which already once tried my patience and I had several drips onto the cardboard (which I had spray painted white) that just made it look messy and sloppy. So, I spray painted over that whole mess with the red and it looks so much better. Next time, if I try ombre (and I might b/c now the girls want this same decoration in their rooms!), then I will spray paint the spoons ahead of time (some dark pink, some lighter pink, some white, etc) and then glue them on – I will not try to paint with acrylic paint and paint brush again – no thanks! I made this one for the laundry room since I spend all my time in there anyway and I thought I’d like a pretty flower mirror to look at – makes complete sense, right? Yep, my husband thinks so too! :-p
I’m planning my third grader’s “winter” party this year. It’s a little challenging finding winter related things that don’t have to do with Christmas – thought I’d share the plan here in case anyone else could find this information useful.
Craft 1: Beanie snowmen: We will make snowmen (and women :-p) out of socks, rice, rubberbands, buttons. I’ll prepare the base snowperson (don’t want rice all over the floor of the classroom :-/ ) ahead of time and they will decorate, etc. This video is basically where I got the inspiration and I’m going to do make the base snowperson the exact same way, but I’m not going to use pins in the classroom b/c I don’t know if the teachers or parents would like that. I’m planning to use some heavy duty glue dots that I found at Joann’s. They were $7, but Joann’s often has coupons for 50%off, etc. These glue dots are non-toxic and stick very well – stuff doesn’t come off unless you yank it. I also bought googly eyes and orange pipe cleaners for the nose ( you can just poke the pipe cleaner straight through the sock – no glue dot required there). I found adult male tube socks at Walmart for a really good price (10 pair in one pack) for about $7. One pair will make 2 snowmen so not bad. The only other thing I’m adding is that I’m going to get some Christmas socks from the dollar store and cut them up to make ugly Christmas sweaters for the snowmen – gotta inject some humor in this somewhere! :-p
Here’s a pic of how ours turned out (Pinterest fail or win?):
Craft 2: Pipe cleaners and beads to make snowflakes. I’m going to bring an example and make the snowflakes out of pipe cleaners ahead of time so the kids just have to add the beads. I bought relatively big sized beads (pony beads work well) b/c if the beads are too small it would take way too long.
Game 1: Cup stacker – stack 28 cups into a pyramid in under 1 minute. Using 28 winter cups, the students will try to make a pyramid in under a minute – this will probably take a few rounds for any one kid to get – takes a while to figure out how many to use as the base. I’ll bring 2 sets of 28 cups so 2 kids can do this at the same time. Or we can just have 1 kid at a time and if they master it pretty quickly, we can add on cups. We’ll probably need to do this one on the floor b/c the desks may not be big enough to hold the pyramid.
Game 2: Snowball transfer – transfer snowballs from one bucket to another using only your mouth. Using ping pong balls and 2 small winter buckets, we’ll have the kids transfer the balls from one bucket to the other using only their hands. Initially, we’ll have the buckets right next to each other but we can make it more challenging by moving them further apart if they master it quickly. One kid will go at a time. I’ll bring more than 21 spoons, so each kid can keep their spoon – don’t want to transfer germs or anything.
Game 3: Winter charades – I’ll make a set of cards with winter words on them and the kids can act out one at a time. They have one minute to get someone to guess and the person that guess correctly gets a point. If we run out of cards, I’ll bring some extra (non-winter) charade cards from home so they can keep playing, but hopefully we’ll have enough.
All the games will be minute to win it style so you’ll need to make sure you have a stopwatch function on your phone or something like that so you can time them – I just have a Clock app on mine and that does most everything.
We had two tenants move out in one year so it’s been a busy year for us. We knew we wanted to update the kitchen in this unit b/c the cabinets were original and pretty grimy inside and out. It would’ve taken quite a bit of work to get them up to par and in the end might have ended up costing only a little less (in effort + money) than all new and wouldn’t have been exactly what we wanted anyway so we just bit the bullet. Here’s some before pics of the kitchen:
Don’t you love the Aztec chickens on the backsplash?!?
So, the more I hung out in this kitchen, the more I realized that the fridge was just seriously in the way. It bothered me so much that I hired a plumber to move the water line (for the ice maker) to the other wall. It was a challenging job – he had to re-route the water line from the basement all the way up. This apartment is on the second floor so he had to go through the first floor tenant’s apartment as well. He basically hooked up all 4 apartments at the same time which was awesome and he finished it all in one day!
In the future, or if tenants want to move their fridge now they are able. Rick Littleton at Plumbing Masters is who we used. We had other plumbers come out to give estimates but they had not-so-good ideas about moving the water line within the apartment through the walls for the same price. I guess they were just intimidated or didn’t know how to run it all the way up from the basement – not sure but so glad we hired Rick Littleton – I highly recommend him. This way, we got it fixed up for all the apartments and not just one. We also had him replace the waste arm for the kitchen sink b/c it’s an old building and just has old pipes and that’s recommended when redoing the kitchen since if it leaks later, you’d have to rip up the whole kitchen again to fix it – that wouldn’t be good.
We had to have an electrical outlet added on that wall as well for the fridge. So, we went ahead and did this in all the units also.
We also didn’t like the wall stove and we wanted to have a built in microwave. And what about that hideous light fixture above the sink built right into the backsplash? No, no, no. It was all just a bit too much so we hired Affordable Kitchens and Baths in St Peters, MO to help us. They were so helpful and the price was right. Hopefully, this kitchen lasts a long time – time will tell.
We ended up using Express Granite in St Peters to do the granite countertops b/c they had a better price, but Affordable did everything else. My husband and his dad did the demo work before hand.
We repainted the walls in Gracious Greige by Lowe’s HGTV, changed out the ceiling fan b/c the old one was covered in grease and the dust from construction just stuck to it like glue (tarred and feathered, it was) – it was going to take more time to clean it (time is money) than just spending money on a new one. My husband did the baseboards. I repainted the trim and the back door (Behr – Polar Bear – this is what we use for all our trim and doors). We put new blinds. I used grout renew (oyster gray) and repainted/sealed the grout after cleaning them thoroughly with a grout brush (see other post about how I screwed it up at first with an oxiclean solution). And wallah!:
Kitchen – AfterKitchen – After
Dining Room/Living Room (Before Pics):
Dining Room – BeforeLiving Room – Before
There’s my kids! 🙂 We removed the cowboy doors to make it more open between the dining room and the kitchen and I repainted the door trim but didn’t replace it. I repainted the walls in the dining room and the living room (Behr – Sandstone Cove). And we replaced the carpet in the living room – had Home Depot do this. We also replaced some of the air conditioning vents b/c the previous tenants painted them and just found it easier to replace. And of course, new base boards. The living room didn’t have a light fixture – we had the ceiling fan added with light fixture.
Dining Room /Living Room (After Pic):
Dining and Living Room – After
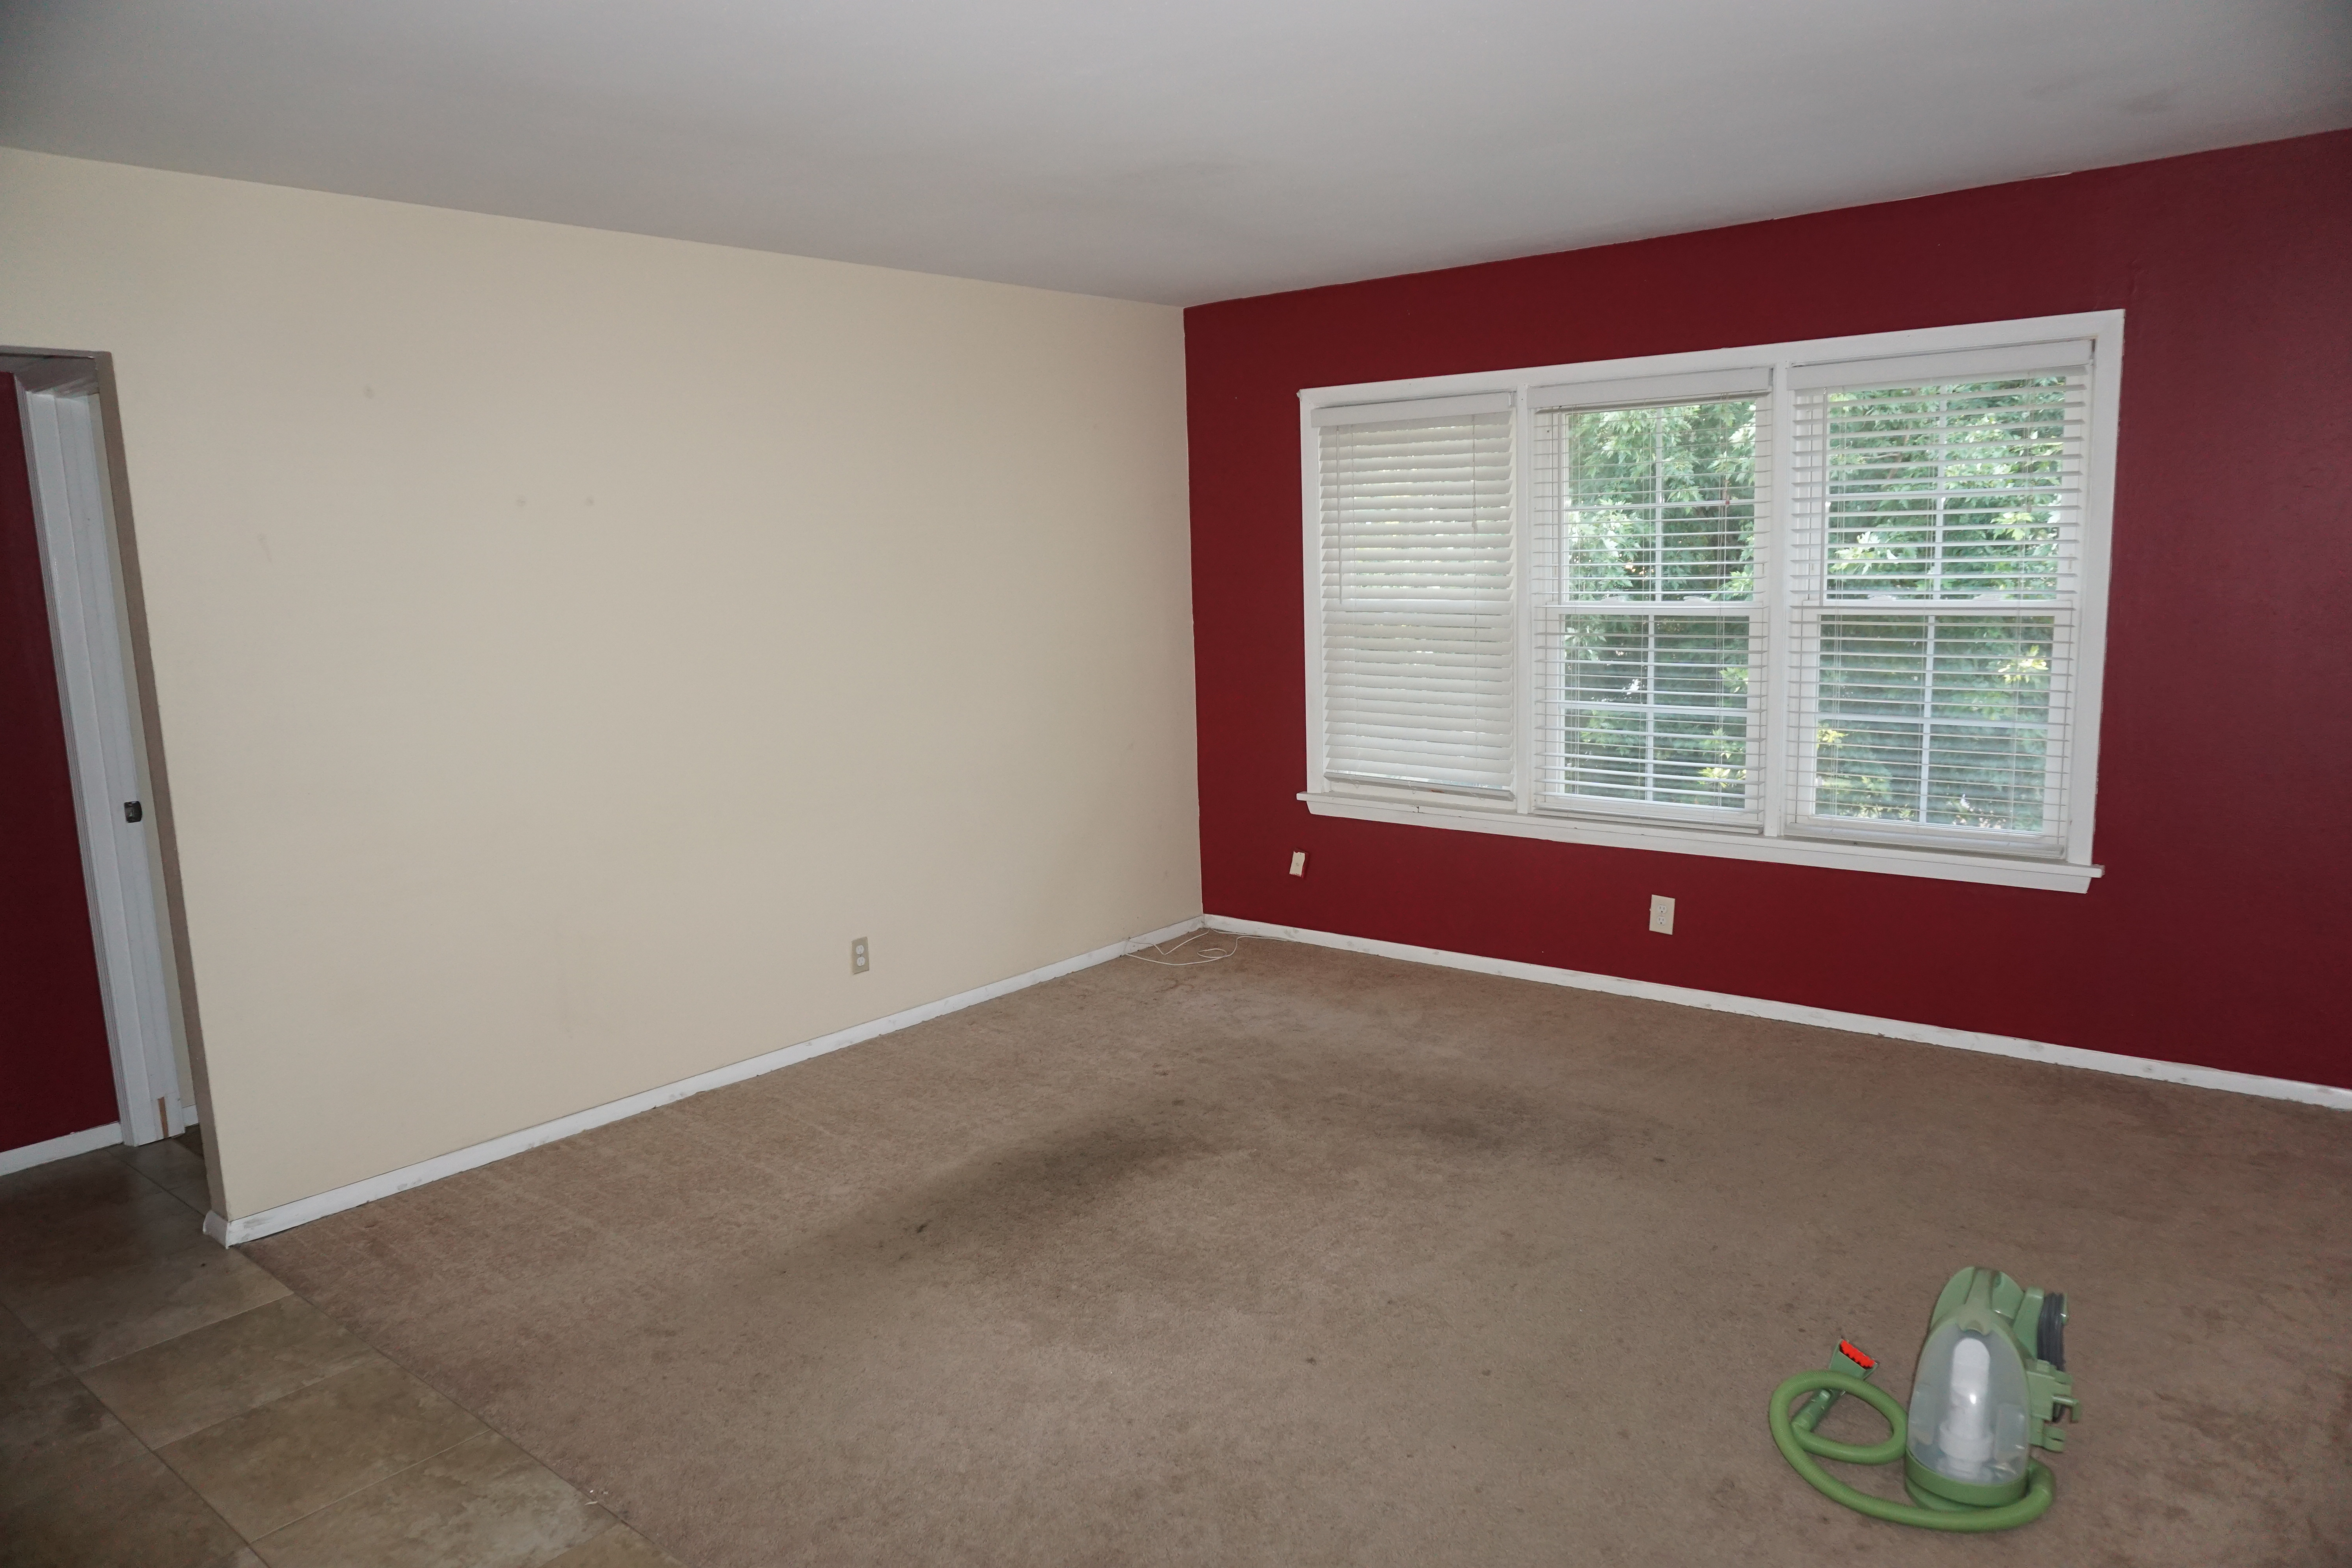
Hallway (Before):
Hallway
We repainted this hallway (Behr – Sandstone Cove) and the old-fashioned light fixture had broken glass, so we needed a square 9 x 9 piece of glass to fit into it. I almost had a piece of glass made but then we went to the Home Depot and they had some hard plastic that they recommended using so we used that instead – Bryon was able to cut it with a box cutter and fit it in – it had a textured pattern as well which looked nice. Then, we got some white spray paint and sprayed the metal fixture white b/c it had gotten scratched up during the transporting process in the car (kids stepped on it repeatedly…). I can’t seem to find my picture of that fixture b/c it must’ve gotten lost the day my phone died. I did have to repaint that 6-panel door at the end of the hall as well b/c it was pretty dinged up. No “After” pic for the hallway. 🙁
Master Bedroom (Before Pics):
Master Bedroom – BeforeMaster Bedroom – Before
The previous tenants had an A/C unit in the window – this is what made us decide to put ceiling fans in all the bedrooms – it’s a second floor unit and I think ceiling fans should be pretty standard in second floor units. They can run on the warmer side.
A couple of years ago, Bryon also got up in the attic to check on the A/C connections and it turned out that the A/C duct work was not hooked up properly (like, not even connected – I’m not sure how the previous owners didn’t catch this (well I guess I know how – nobody likes going in the attic – including the A/C company) – no wonder the tenants were hot) so he reattached the duct work and we got a recharge in the A/C unit – our plumber was also certified for HVAC so he did the recharge for us.
We also replaced the carpet in this room, the blinds, and the baseboards, as well as a fresh coat of paint on the walls and window trim. As you can see, the closet shelving is really old – I think it must be original, so my husband replaced the shelving with a more modern wire racks and we decided to put two racks on each side so that the new tenants can hang more clothes. I repainted the closet doors and we had to put a new closet door knob on the one side. That’s about it for this room.
Master Bedroom (after):
Master Bedroom – AfterMaster Bedroom – After
Master Bathroom (After):
Master Bathroom
Luckily, we didn’t have to make any updates to the master bathroom besides a fresh coat of paint (Lowe’s HGTV’s Basalt Powder – not my fave, but it will do). We really wanted to add a new vanity instead of the pedestal sink so that they could have some kind of storage in this bathroom, but we ran out of time and motivation. :-/ I love the tile work in there though – that was done by the previous owners.
Second Bedroom (After):
Second Bedroom
I guess we didn’t take any before pictures of this bedroom b/c this is where we stored all of our stuff throughout the renovation. We did have to replace the carpet and do a significant amount of work spackling the walls. We repainted the window trim and walls, added a ceiling fan, updated the closet shelving, new blinds, new baseboards. And I think that’s all.
Third Bedroom (Before):
Third Bedroom – BeforeThird Bedroom – Before
The wood floor was nice but they had these unattractive stickers all over them. 🙁 We decided to do the easiest thing and carpet over them. It was a shame b/c we would’ve loved to leave them wood – the girls called it the penny room b/c they found a penny in it and also the dots all over the floor looked like pennies. :-p One wall was wood paneling – we just repainted all the walls with Lowe’s HGTV Stone Isle – I love that color very much and it looked so nice against the white trim. We replaced the blinds, updated the shelving in the closet, new baseboards, painted the window trim and the door to the room. I also painted the ceiling in this room b/c it was pretty bad off.
As you can see, there’s a lot of wires in the corner. The guys that lived here previously were three college guys and they paid extra to have Cat 5 lines running through each room – this way they could each get very high speed internet. Unfortunately, it was an eye sore. So Bryon debated between cutting the lines or taping them to the wall or … In the end, he decided to keep the functionality but instead he put Cat 5 (ethernet) outlets on the walls in the closets of all the bedrooms and in the living room so that any future tenants would have the option of hooking up the lines without the need to drill new holes in the walls or they could not. The Internet comes in the apartment through the master bedroom closet so future tenants could just use wireless and not have to have these ugly lines running through each room. Anyhoo, we left the option and just put outlets on the walls so they could hook it up if they want but we guess most people won’t want that.
Third Bedroom (After):
Third Bedroom – After
Hall Bathroom (After):
Hall Bathroom
Only thing we did to this bathroom is paint the walls in Lowe’s HGTV’s Icy Avalanche. This is not my favorite color but it was good enough. It’s a very manly color though so I think guys will like it. Oh, and we added a new curtain rod.
Common Area (Front):
Well, as if renovating one unit wasn’t enough. We wanted to add more work for ourselves. :-p The front of the building walking up to the apartment hadn’t been updated in a looong time and it showed so we really wanted to make that look nicer. I wish I had before pictures, but I don’t. 🙁
Downstairs Common Area:
Common Area First FloorCommon Area- First Floor
Upstairs Common Area:
Common Area Upstairs
We had new carpet put down. Shout out to HomeTown Floors in St Peters, MO! They rocked the house on this one. Bart came out to meet with me several times to make sure I had what I wanted. He helped me pick out the type of flooring – this is a commercial carpet in dark gray. And the installer David and his wife, Matilda, were such an amazing team. They worked their tails off to finish the carpet in one day and it was a pain to get around this banister – let me tell you. The previous owners didn’t have carpet up here for that reason, but he did such a great job. We love the end result.
We repainted the walls in Lowe’s HGTV’s Stone Isle – my new favorite color. And I made some magnet boards/bulletin boards (couldn’t resist the opportunity to make more magnet boards! :-p). I figure why buy boring art work when you can have magnet boards!! ooh La La! :-p The downstairs has 2 dry erase/magnet boards and a bulletin board in the middle. The upstairs are 2 tack boards and one magnet board. I have a blog post on how to make the tack boards as well.
Cara (my 6 year old) actually made the yarn design on the left and I made the one on the right. I like Cara’s better. I think these tack board patterns could be a good representation of each of our minds – see how mine is all tangled up and chaotic? – my brain feels just like that. There’s also a picture of the mailbox – my husband added some trim around it – it was an eyesore before with jagged wood all around the mailbox from when they installed it.
Common area (Back):
Common Area – Back StairsCommon Area – Back StairsCommon Area – Back StairsCommon Area – Back StairsCommon Area – Back Stairs
Again, double shout out to HomeTown Floors for rocking out these back stairs in only one day!!!!!!!!!!!!!!!! Did I mention that I love them? David and Matilda again rocked it out. Bart helped me pick out the flooring type and coloring to match the paint. These stairs used to have metal (gold) treads on them that were sooo loud. It was like someone was beating a metal can 20 times every time someone went up and down the stairs. If you wanted to be inconspicuous, you’d have to make like spider man up the stairs.
So, Bart had this idea to use rubber treads and it is so quiet now! Not to mention, it looks so much better and it’s so easy to clean – just sweep and damp mop after. The rubber treads sweep off really easily which I was kind of concerned about – I thought stuff might get stuck in there, but it doesn’t – just sweeps off.
We also painted the walls back here (Behr’s Vintage Linen) – it’s a neutral, off-white sort of color – very warm – I like. And it goes well with the flooring – thanks Bart! These walls were a challenge to paint though. They used to be a glaring white color with lots of dings and stains. But these walls are extremely tall in places so I really did hesitate to paint them until the very end. And my husband helped. I have a separate blog post on how we were able to paint the tall walls so check that out.
Another thing my husband did, was update the trim around the furnaces. It was basically one of those eyesores that needed to be fixed. Rule of thumb in rentals – if it’s an eyesore, fix it. A piece of the trim was missing and we couldn’t match the trim at Home Depot or Lowe’s so my husband thought – no big deal, I’ll just buy all new trim and update the whole thing. Which normally it wouldn’t be a big deal but as we know with renovating that even the smallest of things has the potential to turn into a big thing. (Makes you think extra hard about even replacing a towel rack lest the whole wall fall down, eh? :-p)
Well, after he started removing the trim the door frame basically fell out. It turns out that the door frame was being held in place by the trim.. So, a new project began of installing the door frame which involved a lot of shimming and working around odd shaped jutting out sheet metal while on an extra tall ladder above stairs – so not fun!
And, of course, I had to get up there and dust those furnace doors which hadn’t been dusted since 1969 – no joke.. I sort of re-realized that I am scared of heights – a fact that I take for granted on a day to day – especially on a shaky extra tall ladder at the top of a flight of stairs but I had to get that very last dust bunny.
After he got the door frames secured, finally the trim project could begin. Are we done yet? Not yet, then he needed to install new baseboards.
In the garage, we installed a new garage door opener.
In the basement, my husband patched up some holes that were made in the plaster when the plumber put in the new fridge water lines. Turns out, working with plaster is not too easy either. I still haven’t found anyone who will replace the holes in plaster in the basement garage where we had to replace some pipes – one guy sent me a stone-faced email: I’m sorry, but I cannot help you with your plaster project. 🙁 I get it.
Shur-line edger (the one with wheels that can be attached to extender pole)
Duct Tape
Paint Brush
Paint pan that is wide enough (see the metal pan bought from Home depot) – you’ll need to be able to easily fit the shur-line edger in there flat so test it out before you buy the pain.
Extender pole for painting
Paint roller (that can be attached to extender pole)
Trim roller (that can be attached to extender pole)
Ladder (we borrowed an extra tall one from my husband’s dad)
Here’s a picture of the tall wall (this was the finished result):
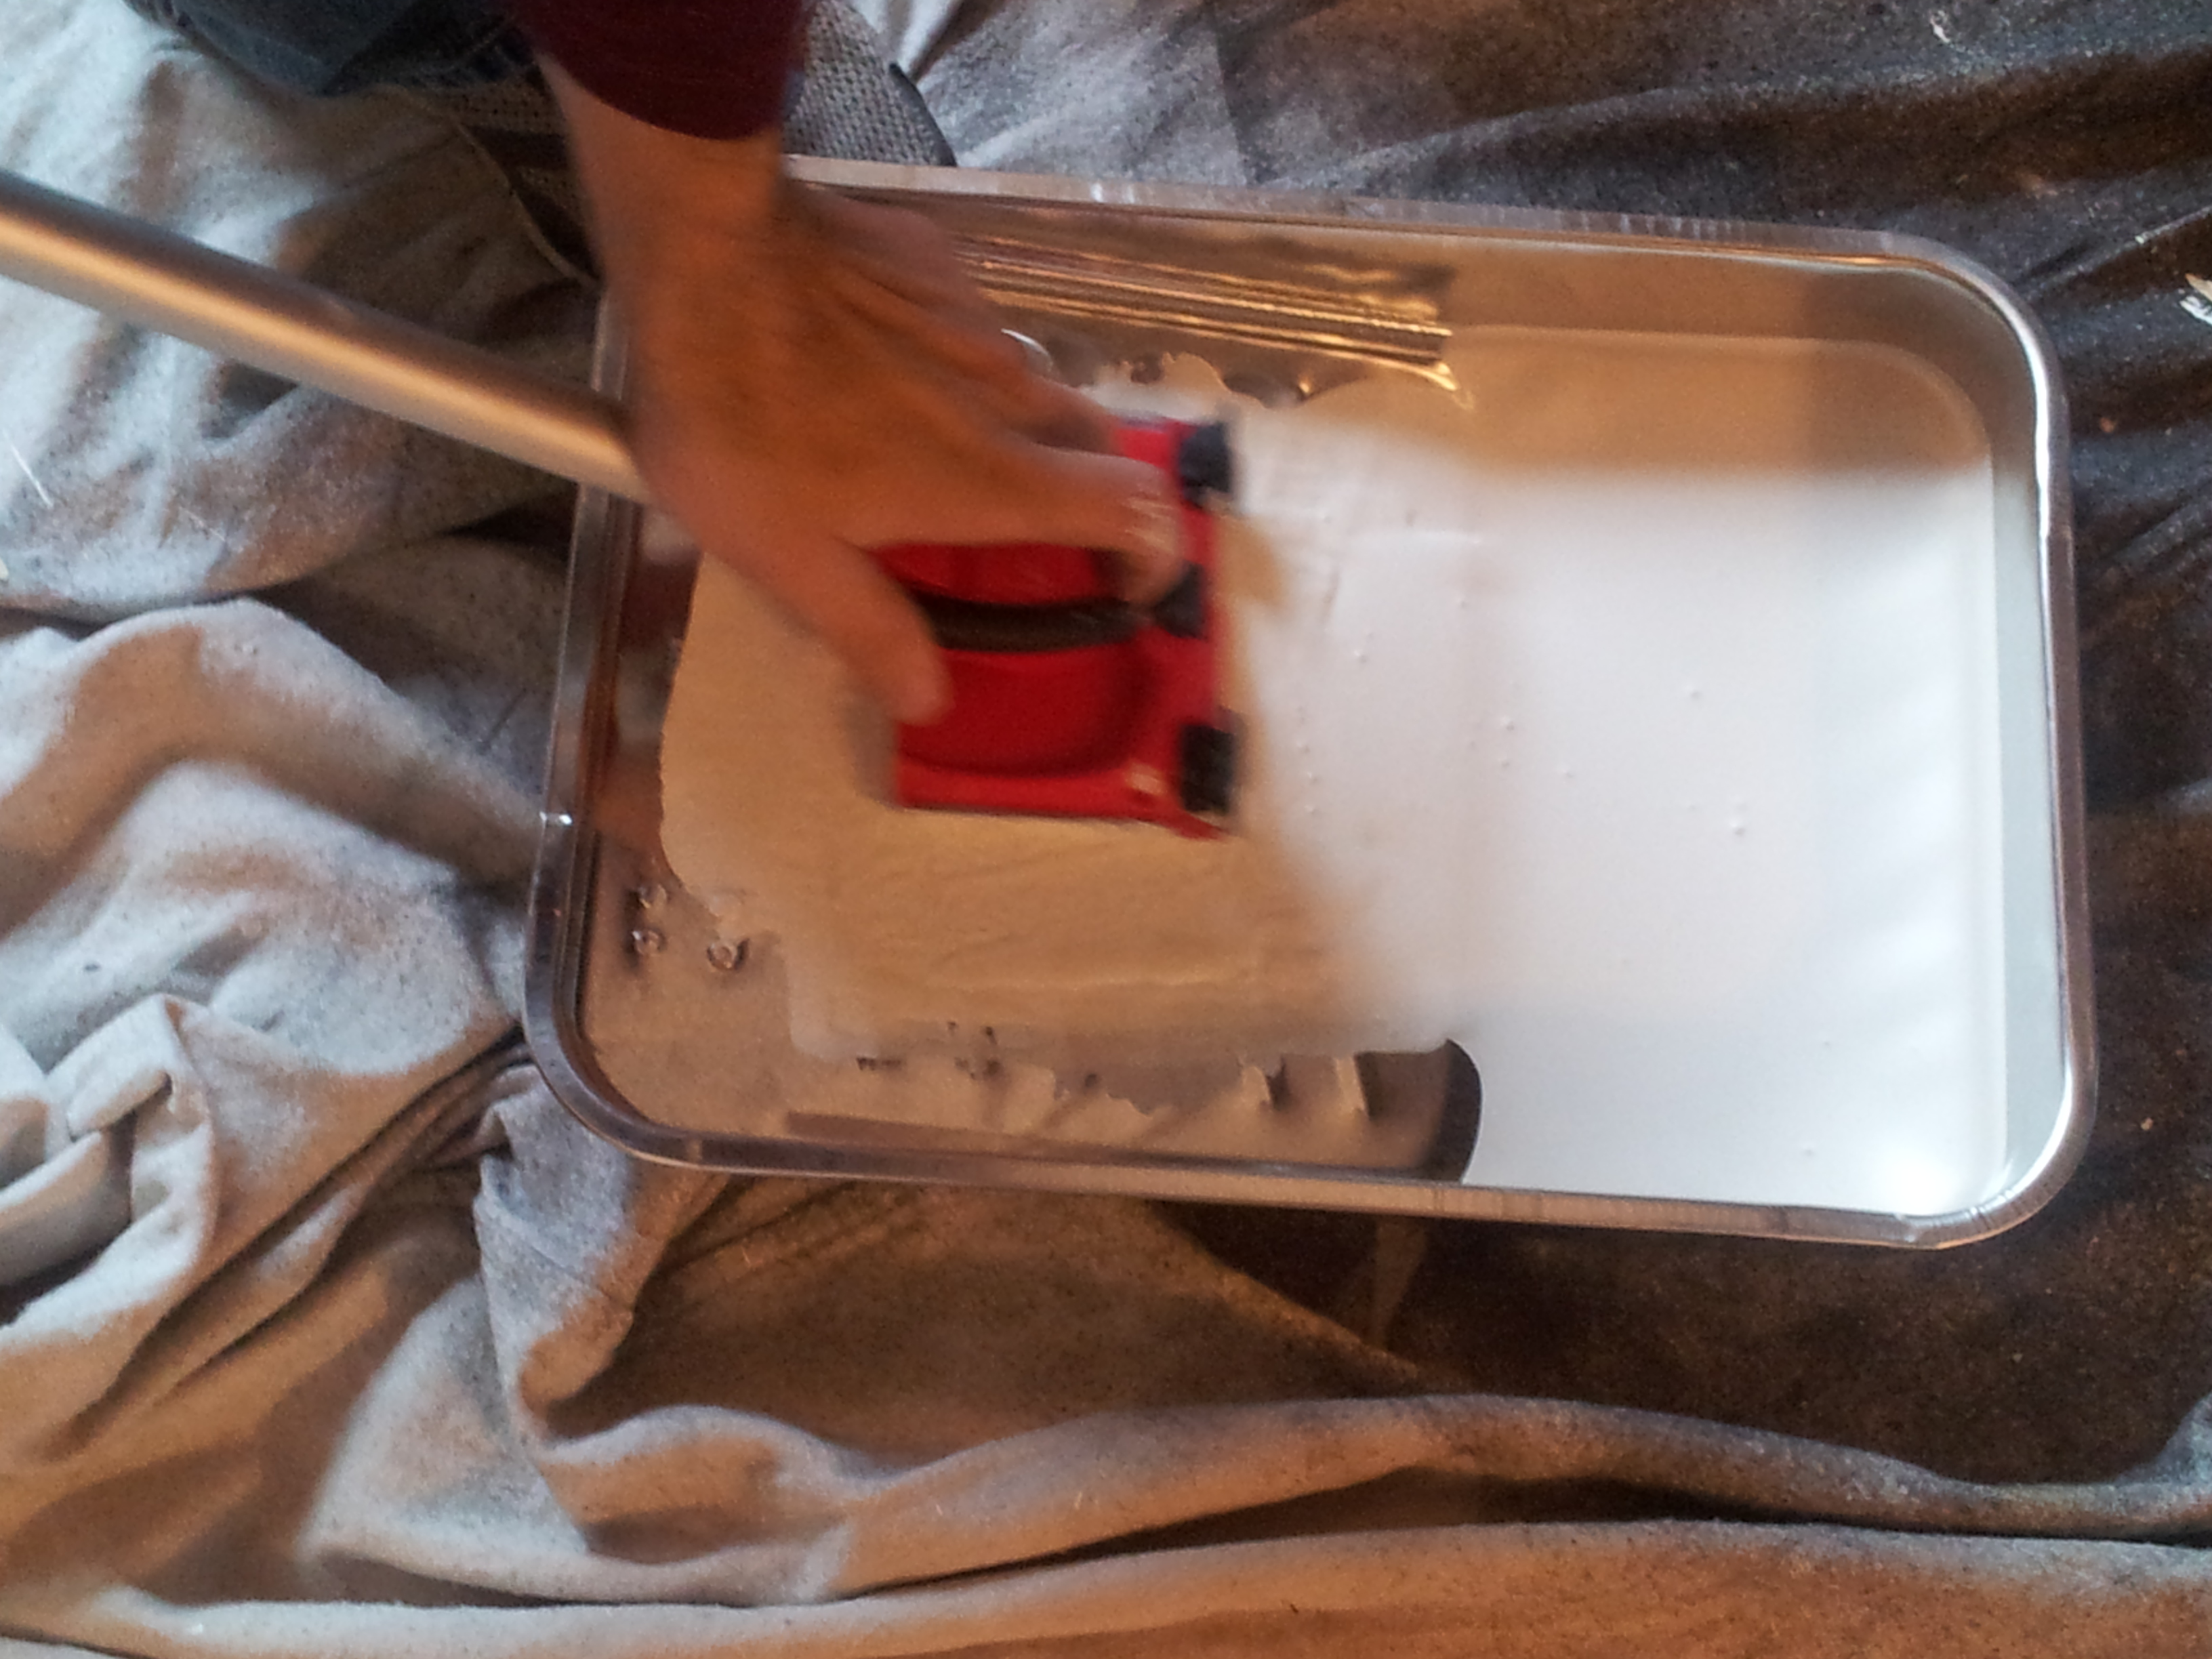
We rolled the walls with a roller and extender pole which got significantly harder the higher you got on the wall b/c you don’t have as much control on the highest parts and you can’t put as much pressure. Then, we were left with the edges and the corners of the wall to do. We bought this Shur-Line Edger from Home Depot (the one with wheels) and this metal pan b/c the paint pan we had wasn’t wide enough for this edger So, you rest it in the paint and then you need to squeeze some of the paint off, especially at the upper edge near the wheels. This is very important b/c if you have too much paint near the wheels it’s going to squeeze off onto the ceiling.
This is what your edger should look like. See how there is less paint at the top?:
It should not look like this:
Now, push down the ceiling protector:
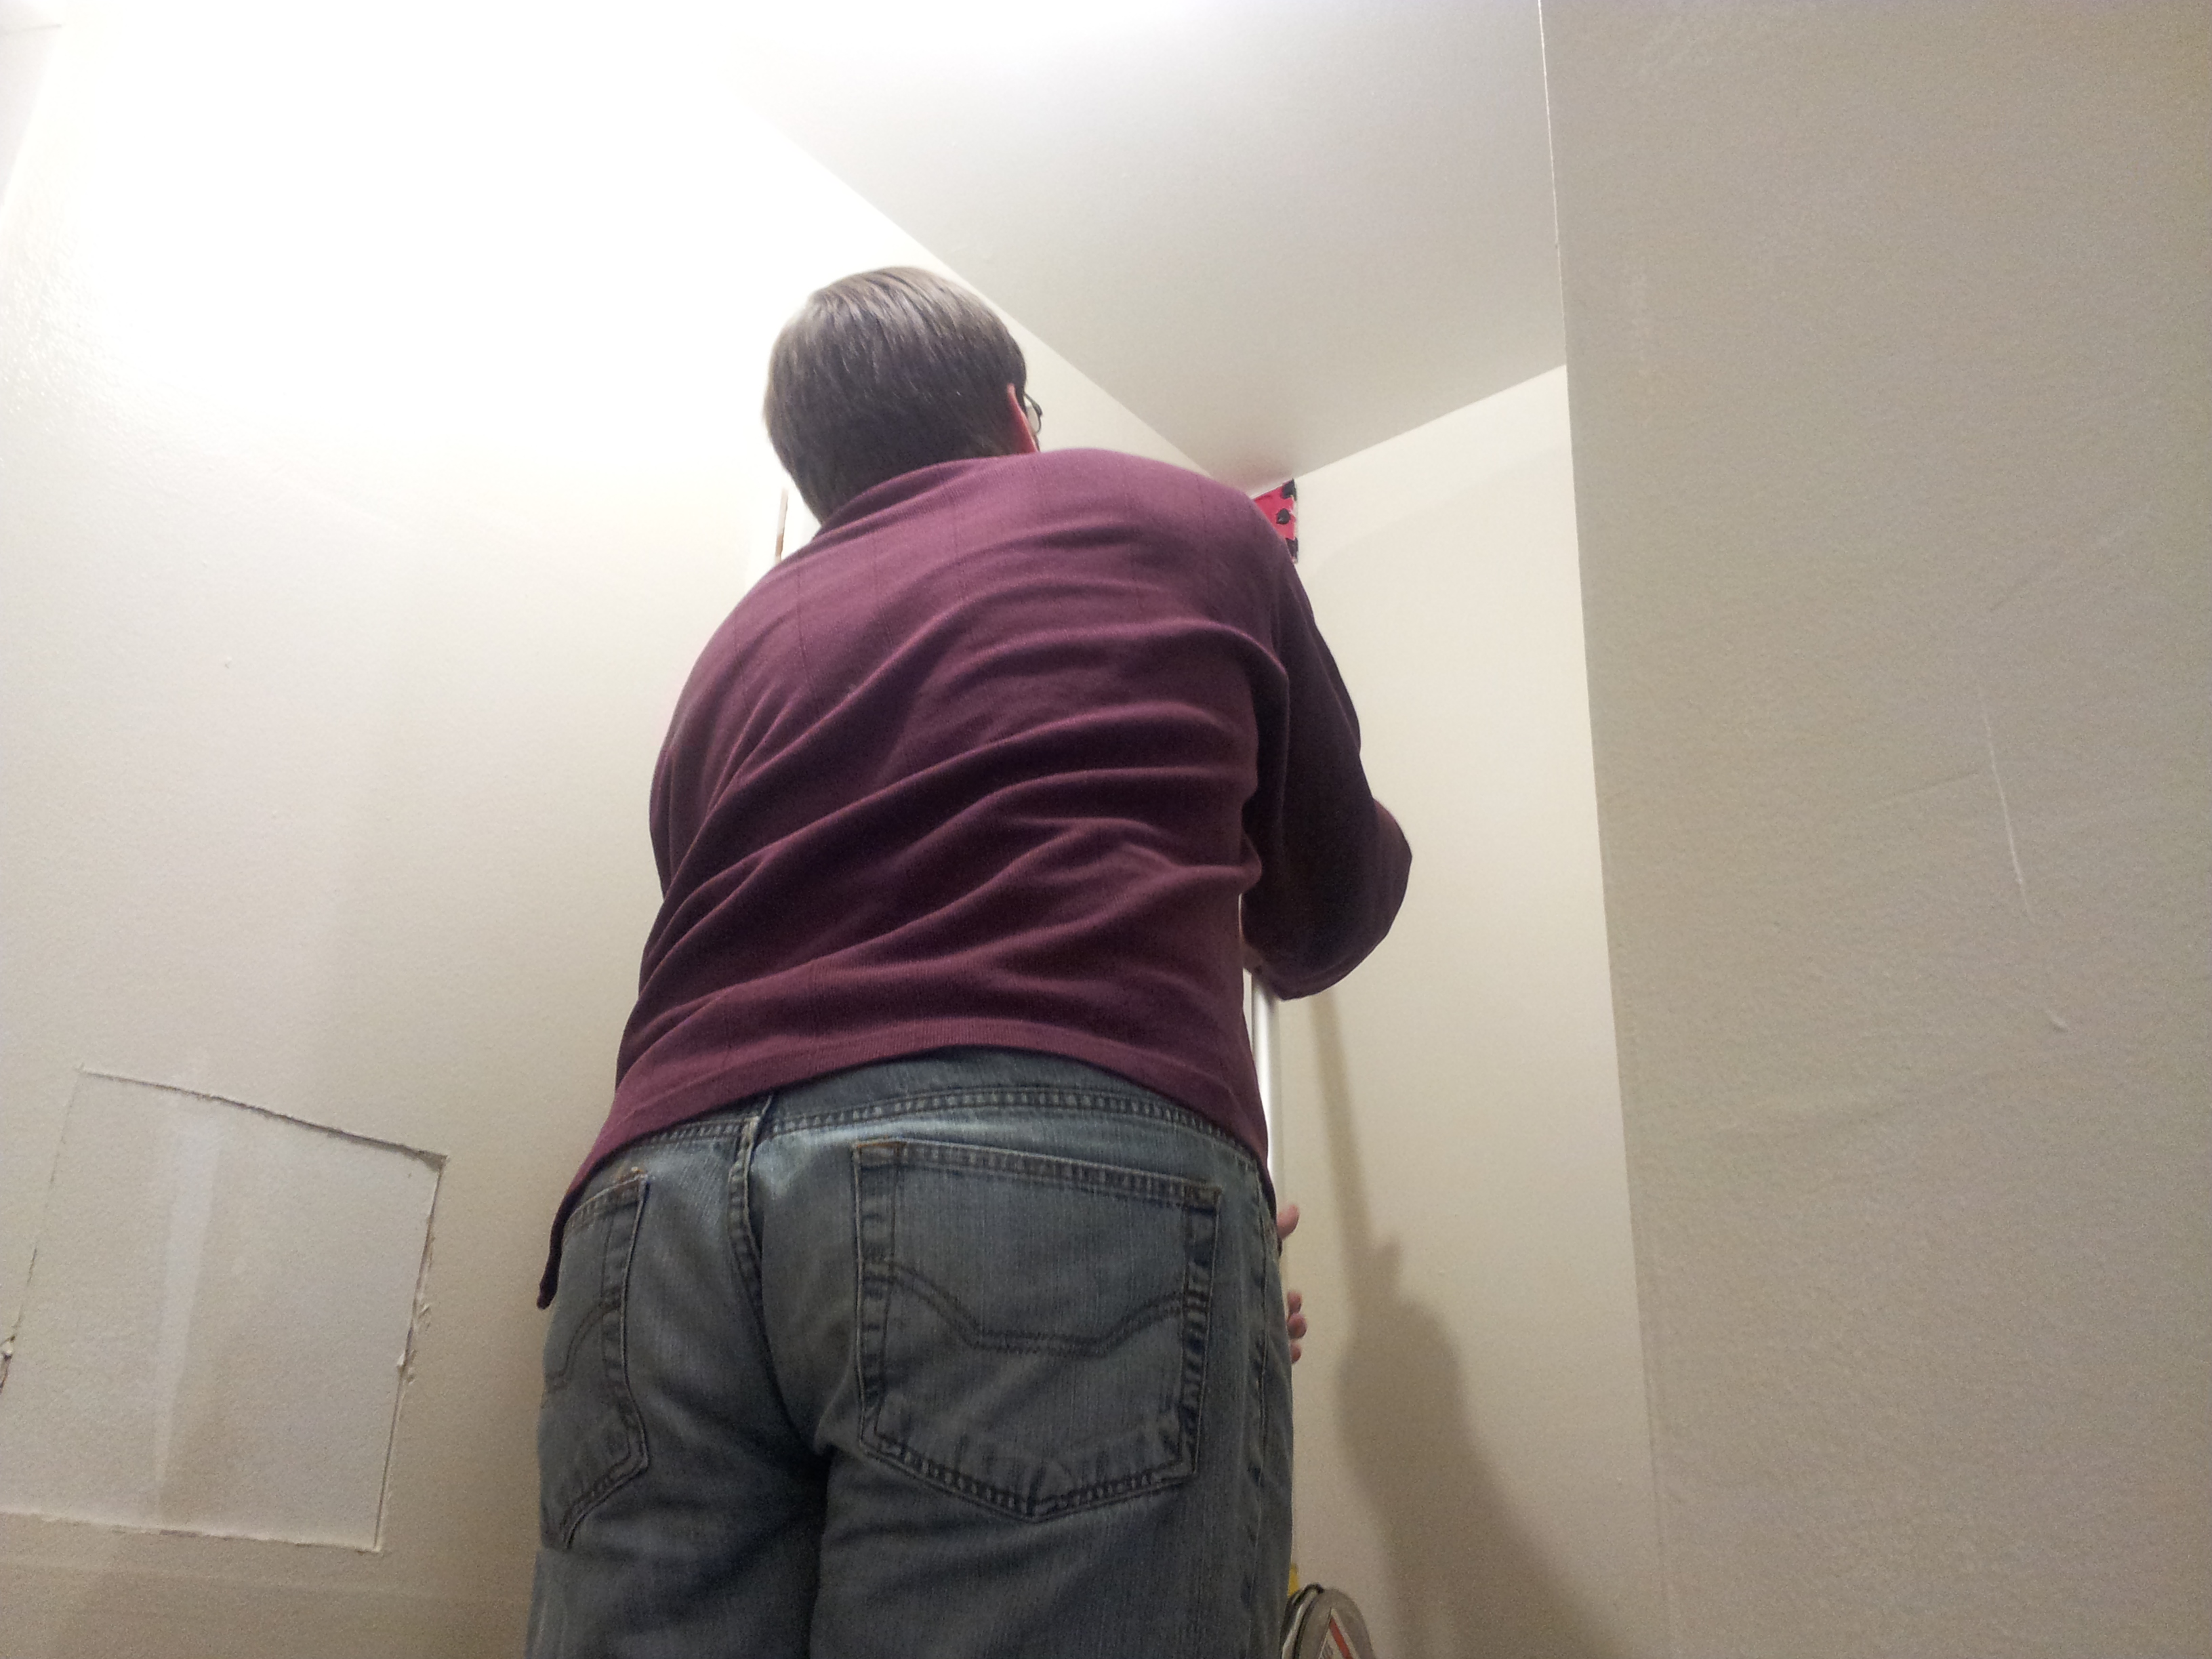
And edge away! The important thing is to move this thing side to side, not up toward the ceiling or again you will push paint up over the wheels and that will get it on the ceiling.
And make sure you are clinching your butt cheeks just perfectly as seen here. Sorry, I couldn’t resist that one. But seriously, my husband did use a ladder for this b/c you can have more control over the edger this way, but there were areas on the stairs where he couldn’t use a ladder and it still worked out fine. But make sure you practice before you try it on a hard to reach area. It takes some trial and error to get used to the way it works. This is something I didn’t do in the front common area and I did get it on the ceiling in places – woops! Again, I’m still working on my impulsivity and impatience.
And then for touching up, I duct-taped my favorite paint brush to the extender pole and touched up some of the corners, etc. The edger doesn’t work as well in the corners – the head of the edger actually rotates to do the corners, but we just didn’t think it worked as well as it did near the ceilings – mostly the corners had to be touched up. My husband used a trim roller (see pic below) in the corners also – this worked better for corners. And we’ve just seen that they have corner rollers at Home Depot though we didn’t try them – worth a try next time.
A bad day renovating is a bad day indeed. This day, I couldn’t seem to do anything right. First, I messed up the tile grout in the kitchen by using an oxiclean/water solution on dark grout. Apparently, this doesn’t work too well on dark grout or grout that’s possibly never, ever been sealed… Yep, I should have followed my own advice and tested on an area before doing the whole floor but what can I say?!? – I’m kind of an impatient/impulsive person. I’m constantly trying to work on that and God is definitely trying to help me out with that through experience. :-p
Next, I scrubbed the black fridge too hard and left dull streaks on it – I made the fridge that was only 2 years old look like junk. Really?! The one time I got gung-ho about cleaning something. See – this is why I’m not gung-ho about cleaning! :-p
So, I decided to go home so I wouldn’t screw anything else up and found someone parked right up on my tail which I cursed about in front of the kids – woops! Kids, don’t say the words I said – they are bad! Mommy, which words? Oh, nevermind… While trying to get out of my spot, I bumped the car that was right up on my tail! Then, the lady magically appeared at my window. She offered to move her car and I told her she might want to take a look at her car b/c I think I bumped it. She was nice and said there wasn’t any damage so no worries.. Whew! Now, I just needed to get home in one piece and not screw anything else up!
Thankfully, there was a fix for both things that got messed up. Luckily, my husband is a problem-solver and not a panicky person like me. He had two suggestions and they both worked. Praise God for him – he kept me from trying to jump off a cliff – kidding – not a physical cliff but a mental cliff.
There’s the two products that saved me – Gel-Gloss and Grout Renew!
1.) We just rubbed the gel-gloss all over the fridge door in circular motions (wax on, wax off :-p) using a white cloth and let it dry (sit for 10 to 15 minutes) then wiped off with a cloth. It’s good as new – barely can see where I rubbed it raw. You will want to test on an inconspicuous spot to make sure this is going to work for you. 😉
2.) The Grout Renew was more time consuming. I found the matching color for the grout that was already there. The grout was now splotchy colored – some areas darker than others and some areas were even white, but all areas were at least lighter than before so I got to pick a lighter grout color than it was previous – bonus! I just picked an in between grout color of the same shade and it evened out the light and dark areas. I took a small paint brush and painted the grout renew on the grout, then worked it in with a soft bristled toothbrush. I kept a damp white cloth on hand to wipe off the tile with every application. You don’t want this to dry on the tile. Yes, this was time consuming but it looked great when finished. Whew!
Here’s a pic of the kitchen before renting – it cleaned up pretty nice:
I had some more close up pictures, but I took them with my phone which happened to die shortly after we put the For Rent sign in the front yard with my phone number on it. 😉 God’s trying to help me learn to be less panicky too, I think! :-p
When a tenant moves out, these are the steps we take to get the place re-rented:
Spackle the walls.
Tenants hang pictures and leave holes – these will need to be spackled and sanded before painting. I like to buy the spackle that starts out pink and turns white when dry. The type of spackle that you use makes a difference – sometimes the tenants spackle with rubbery stuff that doesn’t really work and looks lumpy. I use: DryDex Dry Time Indicator Spackling.
Sanding is really important – wait until completely dry to sand or it won’t go well. I buy sandpaper: and just sand it with my hands until smooth. You just want to fill in the hole, you don’t need the spackle around the hole or it will look lumpy so sand it until smooth. Then, wipe off the dust so that when you paint it, the paint will stick.
Paint the walls, doors, & trim.
This usually has to be done if the tenant has been there for more than a year. Sofas leave marks on the walls and just dirt and grime. First, clean the walls, doors, and trim to see what will come off. Potential new tenants always love a fresh coat of paint on the walls and it doesn’t cost much so you get a big bang for your buck. It does take a bit of effort though – I’m the resident painter and I definitely feel like I walk around in a paint fog for a couple of weeks while I’m knee deep in it – all those fumes! Luckily, they make low-fume paint now-a-days but I don’t always buy that stuff b/c they say the stinkier the paint the longer it will last and you don’t have to put as many coats.
Also, paint colors change over time – today people want grays, clay/muddy colors and that didn’t use to be the case a few years ago so it’s good to keep up with the times. If the ceiling needs painting, paint those too – though I try to avoid this if it’s only a little dirty. Painting the ceiling is not fun though it is nice that you don’t have to fret over the color, etc – there’s just one type of ceiling paint and it’s labeled ceiling paint in the store – no fuss and indecision required which is half the pain of painting, isn’t it?
I use eggshell paint for the walls b/c I don’t like the glare of semi-gloss, but satin/semi-gloss might be better for kitchens and bathrooms b/c it’s easier to wipe off. Doors and trim don’t always need to be painted – you’ll have to try to clean first and evaluate – maybe just touch up if you have the original color.
Evaluate the flooring and replace as necessary.
Unfortunately, carpet frequently has to be replaced if the tenants have been there over a year unless you have some really good tenants. We have chosen to put Allure vinyl plank flooring down more recently in hopes that we won’t have to change it out so frequently – a little more expensive, but could be worth it – time will tell. Home Depot has great rates for carpet so again – big bang for your buck. When it comes to carpet, people really appreciate new. If you had good tenants though, you may be able to get away with just cleaning them with a good carpet cleaner. I wrote this post on our experience with different types of flooring: Best Flooring For Rental Houses (Our Experience)
Determine if there is anything that is an eyesore and fix or replace it.
In one case, the whole kitchen was an eye sore so we decided to update it. It was original to 1969 and the cabinets seriously looked like they were made of scrap wood. No amount of cleaning or painting was going to make it right, it was time to update.
Clean, clean, clean.
Mop all the floors. If you have tile floors, scrub the grout with a grout scrub brush. Clean the windows. Clean out all the cabinets and drawers (vacuum out and wipe down) and repaint any wood shelving if necessary or put new contact paper on them. The newer everything looks, the better! Clean ceiling fans. Clean vents. Wipe down walls. Of course, you might not want to do the cleaning until the very end b/c you will make a mess with the fix-up. I typically use a vinegar and water mixture to do all the cleaning – cheaper and very effective. Goo gone also works well for any grease messes.
Take pictures.
You want to document how the house looks before tenants begin to move in. Taking detailed pictures is a necessity, especially if you need any proof when dealing with security deposit claims. Take close-up pictures of flooring, etc.
Check if inspection is required.
Some cities require your house to pass inspection before a tenant moves in. And some don’t. In St Louis, we have two rental properties in different counties, one requires it and the other doesn’t. So, even within the same larger city, the rules are different. And inspection is quite rigorous and you could end up with weeks worth of stuff to fix – from door stoppers, to oven-tipping prevention devices (good call), to repainting a shed (we have had to do that), to power washing the siding, to cleaning soffits so that they look prettier, to rewiring the electrical to get it up to code, to knobs on sliding closets doors, the list goes on and on. Leave yourself plenty of time to fix up all this stuff.
Decide how you prefer to be paid.
We use eRentPayment if we can. Some tenants won’t want to do this if they aren’t computer savvy or if they are more used to traditional forms of rent payment, but it is great when you find someone that is ok with using it. eRentPayment automatically deducts the rent from the renters checking account directly into yours. This is great b/c you don’t have to worry about your rent getting lost in the mail (we’ve had this happen!) or having to remind people (also, had this happen and it’s awkward).
There is a $3 charge but we usually cover that (it’s worth the convenience to us). It’s best to communicate this up front. This could also help with the screening. However, if you like being paid by check or if you’d like them to set up automatic bill pay with their bank – all those things are fine ways to get paid – it’s just best to communicate up front.
List the property.
We like to list on Zillow. Zillow posts to multiple other sites via their postlets app so you get the most hits possible. We used to post on Craigslist, but have found that’s not the best place anymore – not as many people use it so you won’t get as many calls. The second I posted on Zillow, my phone was ringing non-stop and the more calls the better – you want to have your pick of tenants.
It’s up to you whether you list it before you are done renovating or after. I think it’s probably best to list before you are completely done or you will have another month of the property sitting vacant after you are done fixing it up. But it also slows you down considerably to have to show it while you are fixing it. People often need to give 30 days notice, but some people have been at their place long enough that they are already going month to month – they have more flexibility to move sooner.
Also, it’s good to post a sign out front for people who are driving through the neighborhood (if it’s in a good neighborhood).
When you make an appointment to meet someone at the rental, I recommend telling people to give you a call 30 minutes before they head over just to make sure they are going to show up. We had several no shows and it was a major waste of my time and gas.
Once you’ve found your tenant, you can sign the lease. They’ll need to bring a money order with the security deposit and first month’s rent (and occupancy permit if it is required in your county) to the lease signing and you’ll want to make sure you have: the keys to the apt, mailbox key, garage door openers, garage entry code, lease (2 copies – one for you & one for them – highlight the places that they need to sign/initial), 2 pens, etc.
You’ll also want to have a list of the utility companies name and numbers so they can call and have the accounts transferred into their name. Usually, it’s Electric, Gas, Water, Trash and Sewer (we pay).
Finally, it’s best to walk them through the property and let them know the ins and outs of the place. An extra bonus would be to provide them with some information on the neighborhood, etc.
The kids make do when you have to renovate. They love using leftovers. Here’s a pic of what they did with baseboard scraps. They really do like to help, but unfortunately, I really do like to focus. So, it’s hard thinking up ways to keep them occupied besides the movie player. This was one. Also, giving them damp rags and toothbrushes with a cup of water to scrub grout is another one that I’ve used. They just want to feel like they are helping. Although, that backfired with my three year old b/c after she scrubbed dirty grout for a while, she ended up putting the dirty toothbrush in her mouth. 🙁 Oh well, you win some you lose some. Usually, we head to the library and pick out a ton of movies before going to work on a property. They use our portable movie player and that entertains them for a while. But, then you have to get creative..
We’ve recently had experience with trying to clean graffiti off of brick in the indoor common area of our building and I’m going to share a little bit about what worked for us. I’m going to honest with you – it’s a pain! You will need the following:
Goof Off (we got from Home Depot) – you will want to spot test to make sure no discoloration
Scrub brush (wire brush would be nice but we didn’t have one)
White rag
Gloves
Fan to air out the place (those fumes will make you dumb)
60 grit sandpaper
Sanding block
Big muscles and your own grit (aside from the sandpaper’s)
You will want to open windows to air out the place or you may lose a lot of brain cells. Also, wear gloves! You will have to spray those bricks ALOT – like douse them with the Goof Off. And you will have to sand like you mean it. I had my husband do the sanding b/c he had to put his back into it. :-p
Protect the flooring underneath or it may get messed up like ours did (the carpet got stained red) – luckily, we were planning to replace it anyway so we weren’t trying to be too careful.
You will want to cut the sandpaper out and place it into the sanding block. You have to lift up the end of the sanding block to get the sandpaper in there and then once you let it go, the prongs pierce the sandpaper and keep it in place. Do this for each side of the sanding block.
Then, spray the bricks – scrub as much away as you can with the brush and the rag – if that gets it off great. If not, then try the sanding. You may have to sand each brick for quite some time. You’ll have to be persistent here, but you should see results after a little bit.
Disclaimer: If stuff gets screwed up, it’s not my fault. I’m no expert – just a normal person trying to clean up some bricks..
This is the after picture. I didn’t take a before picture – sorry. The brick is still wet in this pic so it took some time to dry and look normal again.


